Editing recordings for #DataWeekender
- community
- 2023-11-14
- 18 minutes to read
Introduction
DataWeekender 6.5 ran on 4th November and we made the decision to release recordings for our event for the first time on our YouTube channel. This post is about the process I went through to edit the videos and publish them.
#DataWeekender?
DataWeekender is an online conference that hosts talks on all things to do with Microsoft Data Technologies. You can find out more about #DataWeekender here , or head over to our website .
Evaluating all the things
We run multiple tracks that cover an array topics, the last event had 35 sessions across 5 tracks. The event ran for almost 9 hours so I have roughly 45 hours of video to work through, which equates to 35 hours of sessions and 10 hours of breaks. Additionally, two of the sessions were lightning sessions, which were 5 lightning talks that ran for 10 minutes each. So that means I have a total of 43 talks to work through.
I also need to take into account that Microsoft Teams splits up recordings. I haven’t been able to find a definitive explanation of when they get split, but the maximum duration of the files is 4 hours exactly, whilst the remainder are anywhere between 0 and 4 hours long. Consider that a 9 hour session will end up with at minimum 3 files (because maximum duration is 4 hours). If it was precise, I would have two files of 4 hours, and one file of 1 hour. In reality though, the first two files of a session are somewhere between 3 and 4 hours long and the third file is the remainder of the duration, until the event ends.
There is no consistency in when they split and this is made even more inconsistent because the recording starts when the organiser of that track joins the meeting. So in the end, the recordings all start at different times and the files split at different times during the day, so some talks have splits in the middle of them, some breaks have splits in them!!! There is another element to this, Microsoft Teams has an elegant approach to ensuring it doesn’t lose any content, it commences the next recording before starting the next recording. You can observe this in the teams chat:

This catches out folks quite regularly, I have had several behind the scenes conversations with issues raised that the recording has stopped but the recording hasn’t started again! That’s ultimately because it’s earlier in the chat.
At least in theory I am expecting there to be overlap between the files. I am not sure how much overlap there is, but I am expecting it to be a few seconds and it’s potentially in the middle of a talk so when joining the files back together I am going to have to work with the overlap so that the recording becomes seamless. I have also never published anything to YouTube before, so there is that too. Hopefully that’s the least problematic thing to deal with.
Finally, we give speakers the prerogative to opt out of having their session published, so I am going to have to work through the list of sessions and speakers to ensure that I don’t publish anything that shouldn’t be published!
Decisions
I have a decision to make about whether I publish the lightning talks as a whole recording or split them into individual talks [1].
I also need to make a decision about how much of the post-wrap-up is published - once a talk is completed we may end up with time for questions. This is likely to be really inconsistent between talks and hosts. I don’t actually know how the other hosts deal with this post-talk, do they wrap up and explain what is coming up next first, then return to questions? Or do they go straight into questions? If the speaker is comfortable dealing with their own questions, they may address the questions prior to handing back to host. I think this one will have to be a case by case basis. For the intro, I am going to try and keep them all consistent and simply drop in at the point where the speaker starts talking. For the outro I think I am going to end up having to play through them and decide on an individual basis where to cut the video.
I also have to make a decision about whether I leave recordings so that they are relatively raw and natural with all the things like screen tests and random chit chat, or whether I trim them right back and put some sort of intro and outro on each talk. Whilst it’s nice to see how things works and there are some really funny interactions[2][3], I think that anyone returning to the content isn’t going to want to see the warm-up stuff so I have decided to trim the content and add an intro[4]. I have also decided to add an outro so that it’s standardised. It also means I can add some branding and guide watchers to other content and / or out website.
Actions
So with all those things mapped out and decisions made my rough plan of action is this:
- Download the content from teams
- Split the files up in the breaks so that I end up with a file per talk (mostly, some will get split by the teams split)
- Destroy the talks that are not to be published
- Duplicate the files so that I have a backup (always take a backup folks!!)
- Find the talks that are split and join them back together
- Trim the start of the talks down to the point at which the speakers start talking
- Trim the end of the talks down to the most appropriate point
- Create a consistent outro for all the talks
- Create an intro that I can template for each talk
- Add the intro and outro to each talk
- Publish to YouTube
iMovie
I am going to use iMovie to edit the videos. I have used iMovie in the past for some basic family movie editing and it’s pretty intuitive. I am not going to burn time researching apps, exploring options, purchasing stuff. iMovie comes with my Mac, I am confident “it just works” and I am also hopeful it’s going to be pretty good at constructing intros / outros. Splitting, joining and trimming files feels like pretty basic functions so I am trusting this will be fine. I am going to start with intro and outro creation and then move onto the actual editing.
Creating an intro and an outro
I have kept this super simple this time round. I am simply going to make use of a some static images of the #DataWeekender logo. Anything more complex is going to take too much time, I am doing this for the first time so let’s keep things simple. Because the #DataWeekender logo has lots of contrasting colours, putting a visible font over the top of it is going to be difficult. In order to fix that I washed out logo for the outro and overlaid some text. That looks like this:
For the intro, I wanted to keep the logo in full contrast so I reduced the size to give me space to put the speaker’s name and talk title. Whilst the outro image is static, I have to change the speaker name and talk title per talk so I am going to use an iMovie title to control the text rather than embedding it into the image. This feels like the easier approach so I only have to deal with one intro image and one outro image.
Once the intro is applied, I will use the title artifacts in iMove to overlay the talk name and title. I applied some nice transitions between intro, talk, and outro to make it look a little smoother. Finally, I set the title artifact to overlap the intro and the start of the talk which adds a nice bit of continuity between transitions.
Setting up my template in iMovie
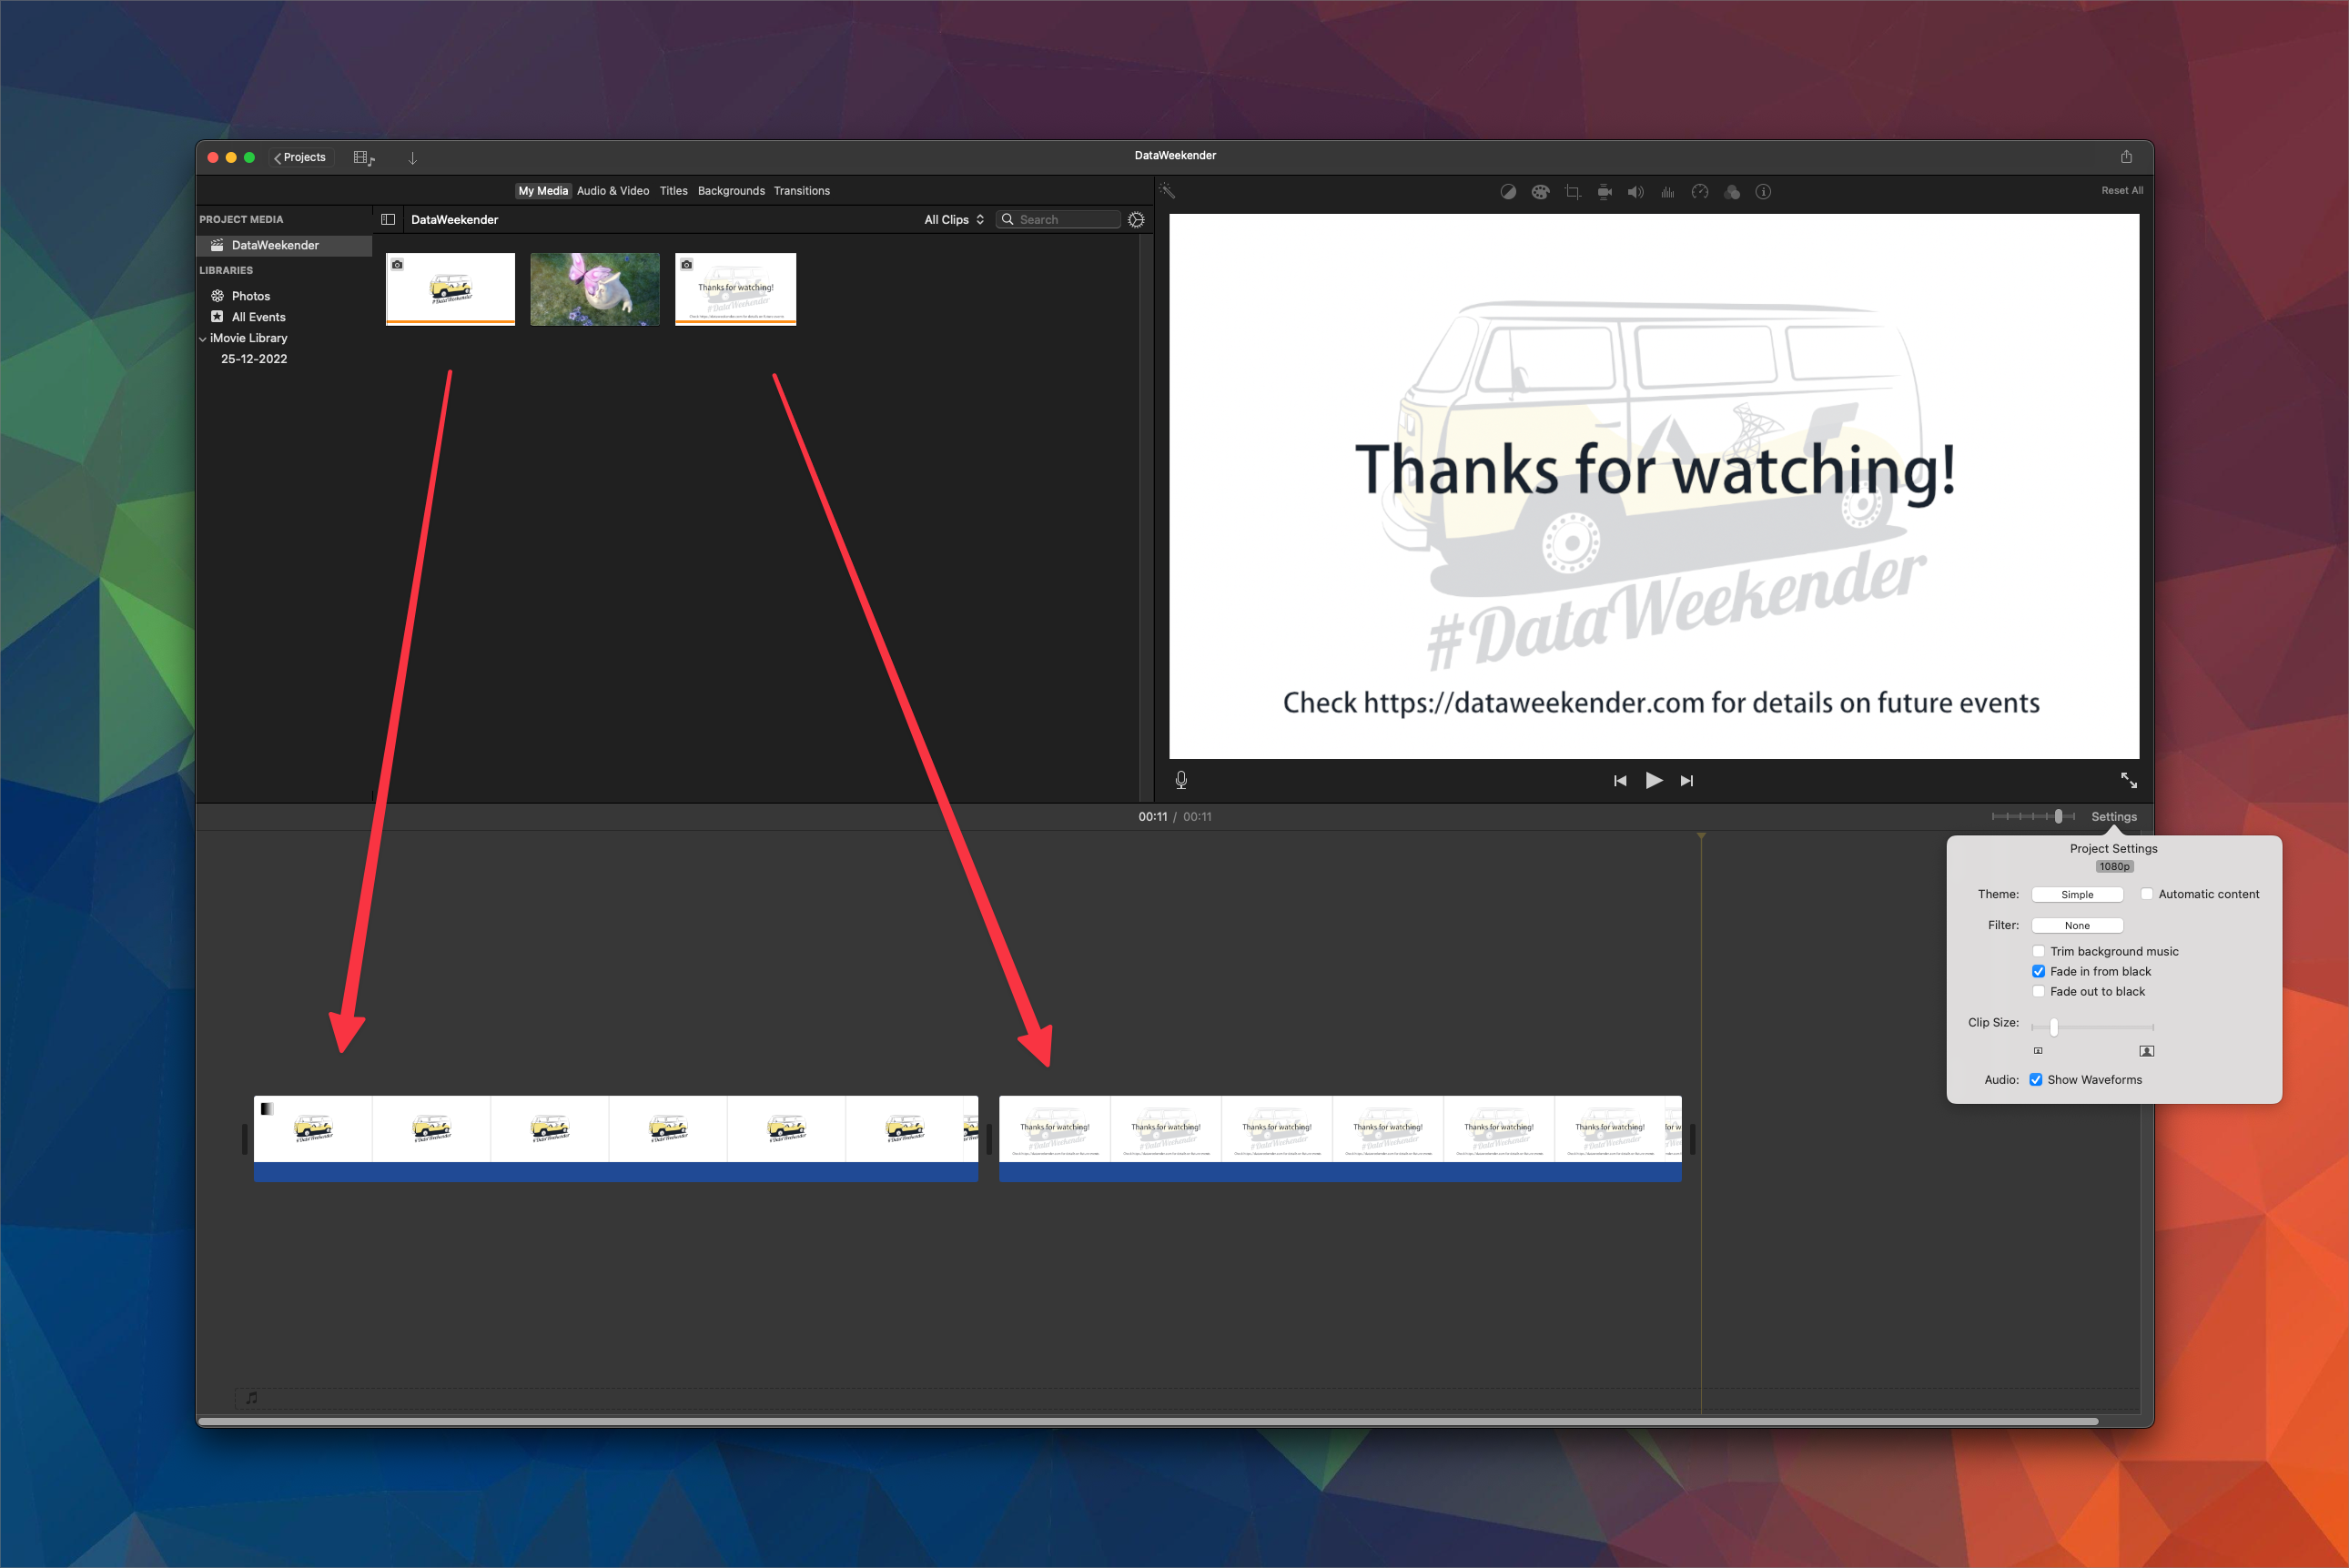
Now I have a static intro and outro. I can put this all together in iMovie. First, I need to bring the intro and outro images onto the timeline and drag them out to set the duration they will appear on the screen.
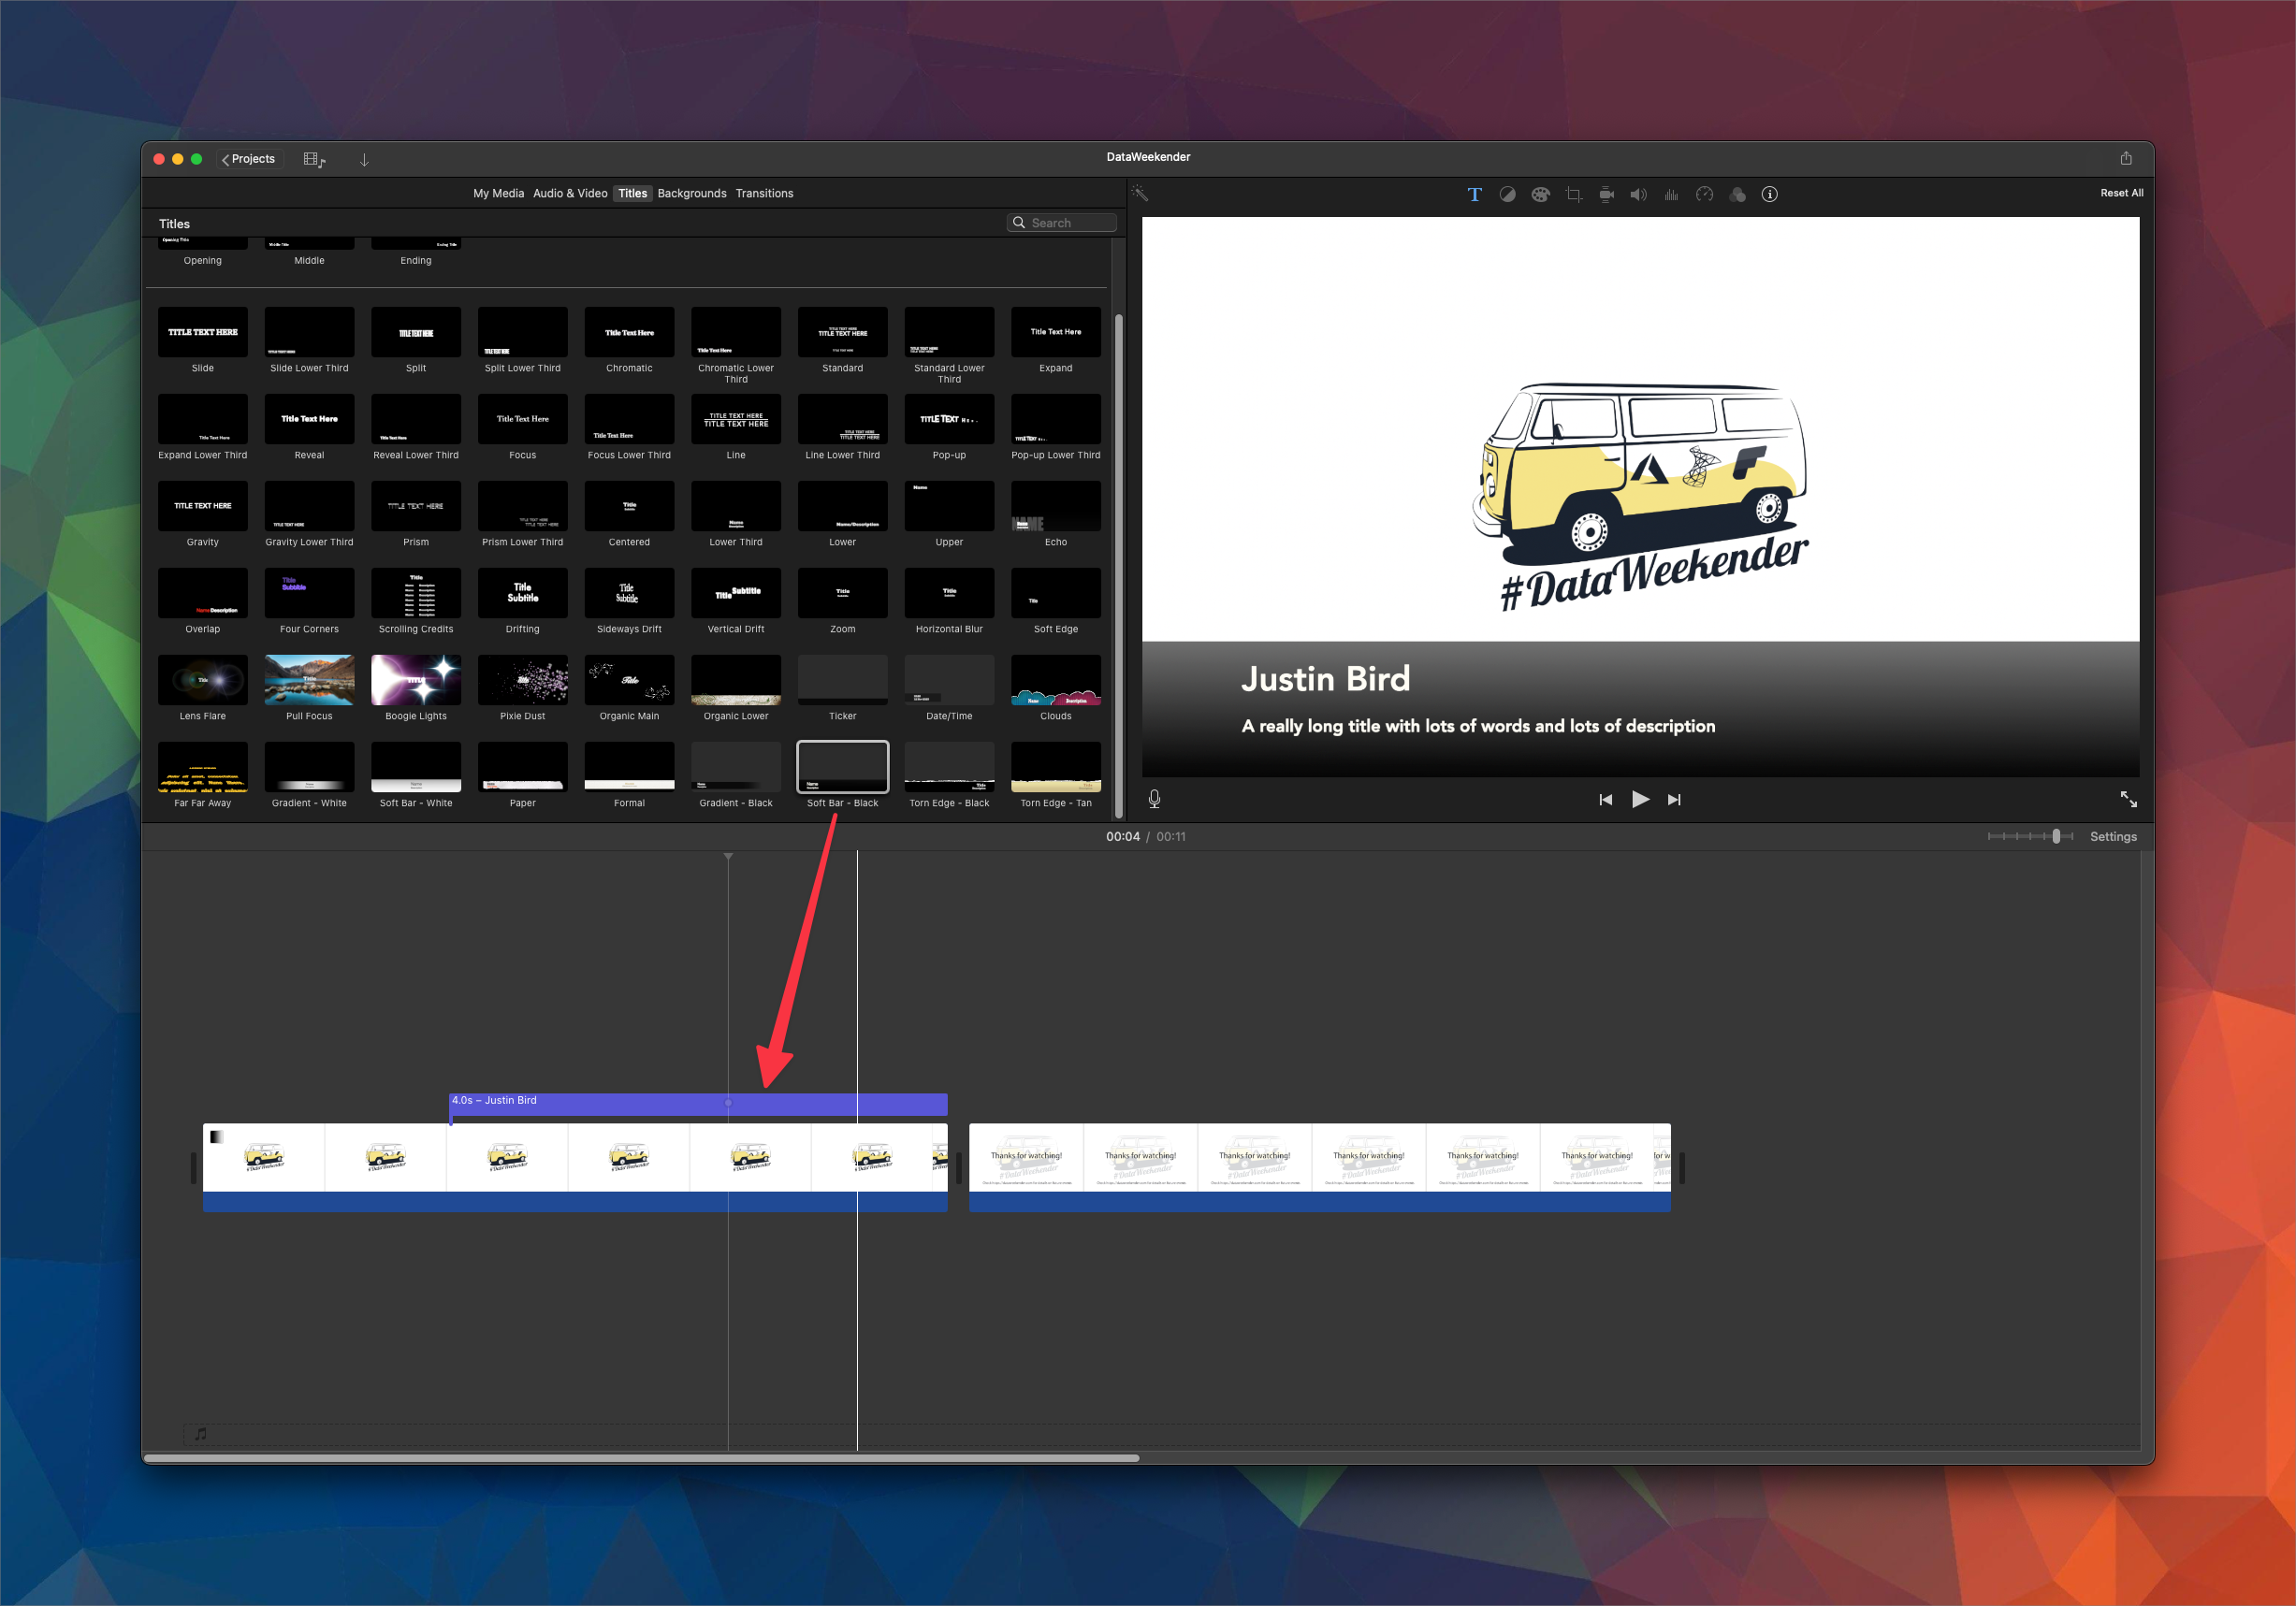
Next I add a title over the intro. Observe that I haven’t set this to start at the same time as the intro, that means it will fade in after the intro image appears.
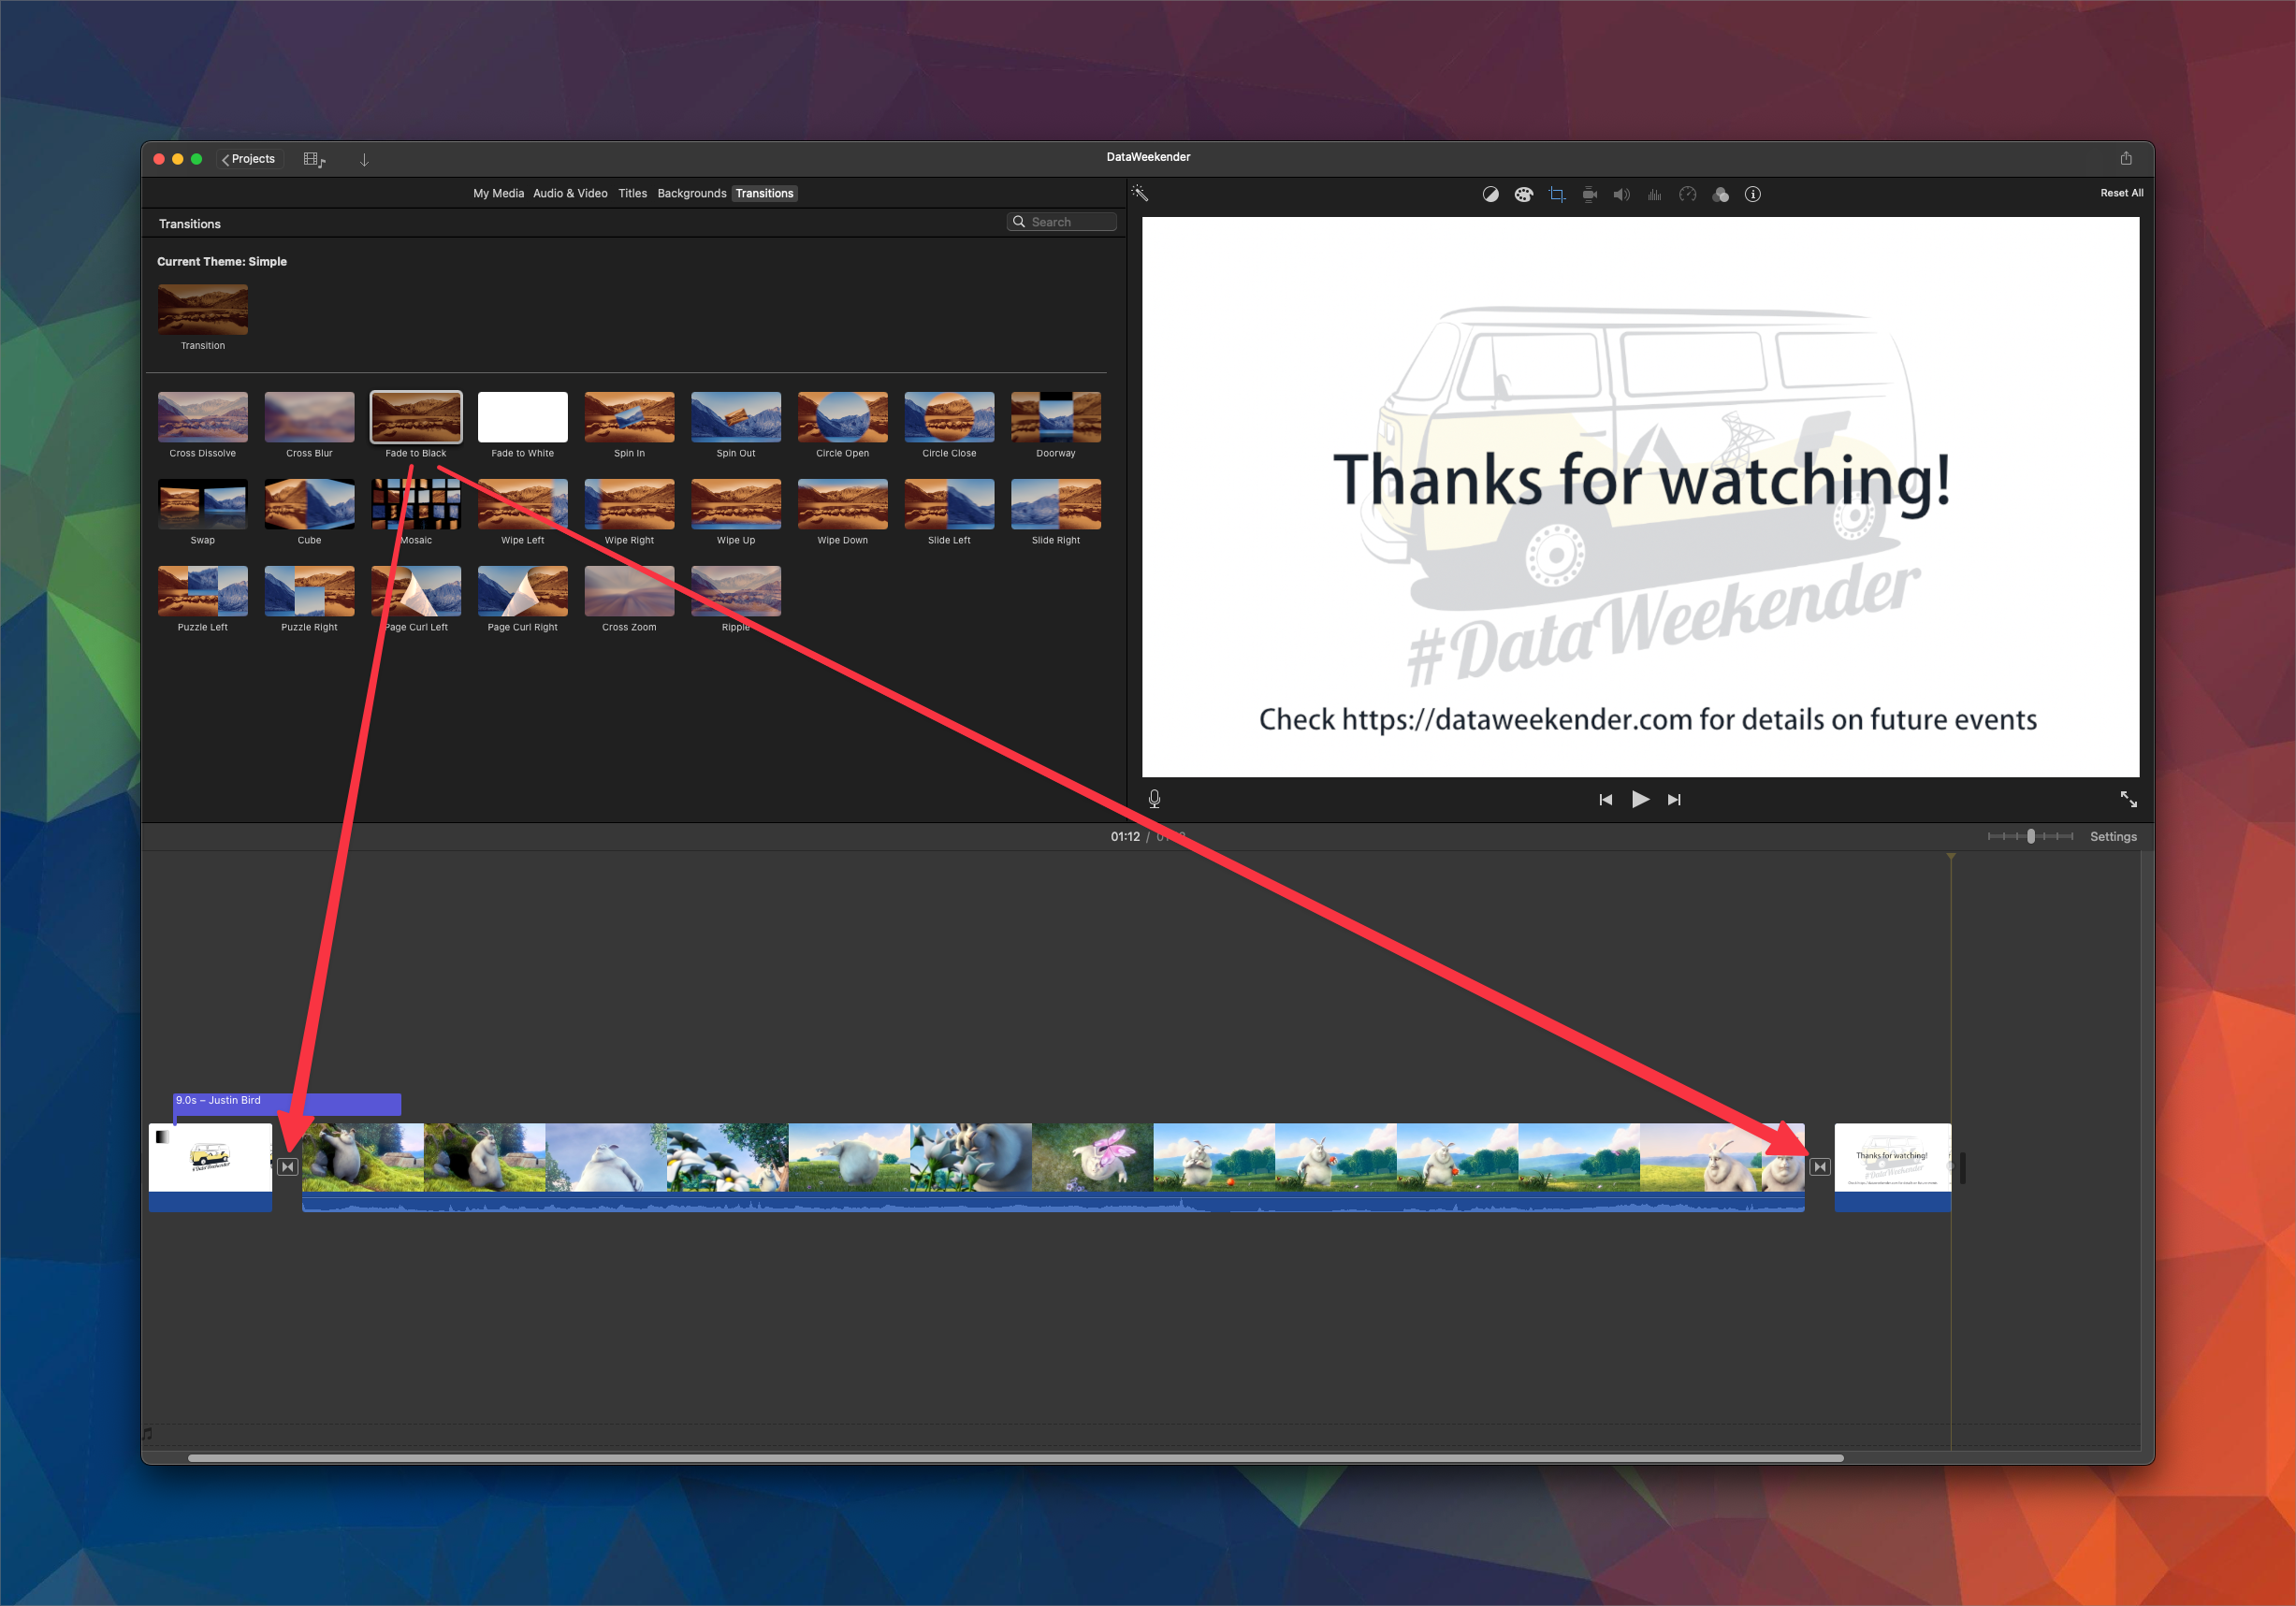
Next I place the movie clip in between the intro and outro images, then insert a transition either side of the movie clip. I want a smooth transition between the intro, clip and outro so this transition will fade to black between each element. Also note that the title is now overlapping the intro and the movie clip, that just adds a nice bit of continuity between the transitions.
So that’s me done with my template! All I need to do now is clip my recordings and swap them in over the test video. Here is an example of how it will all come together (using a sample video from sample-videos.com which I used to do the initial tests):
Rolling out the videos
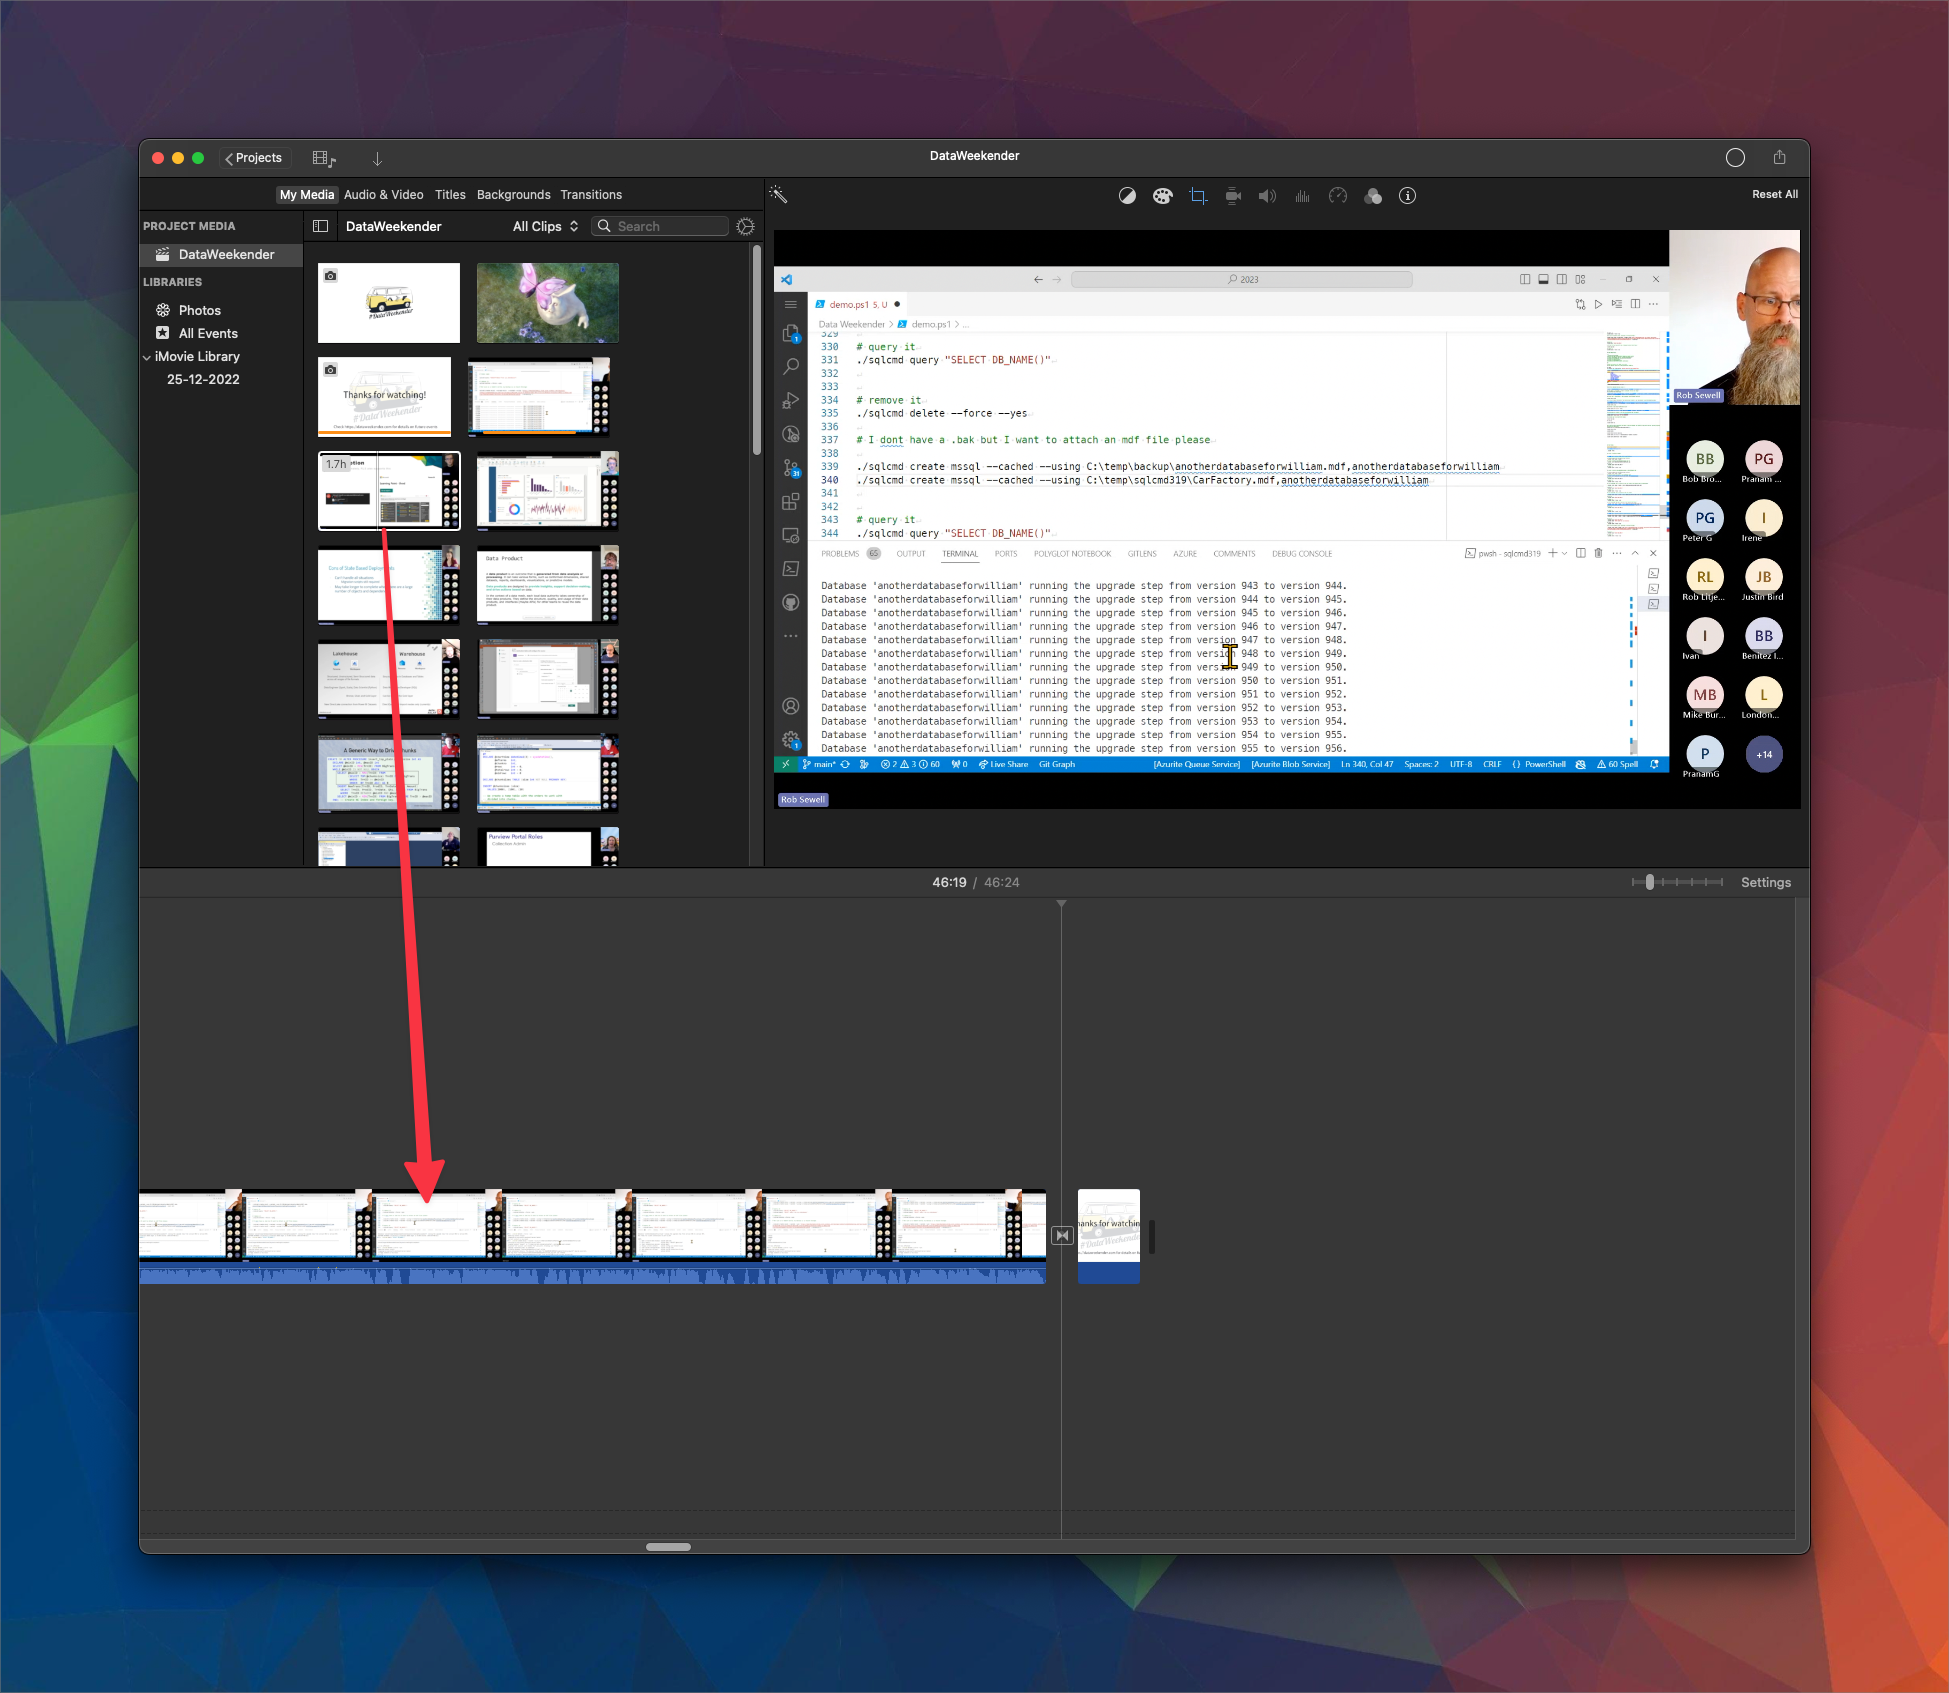
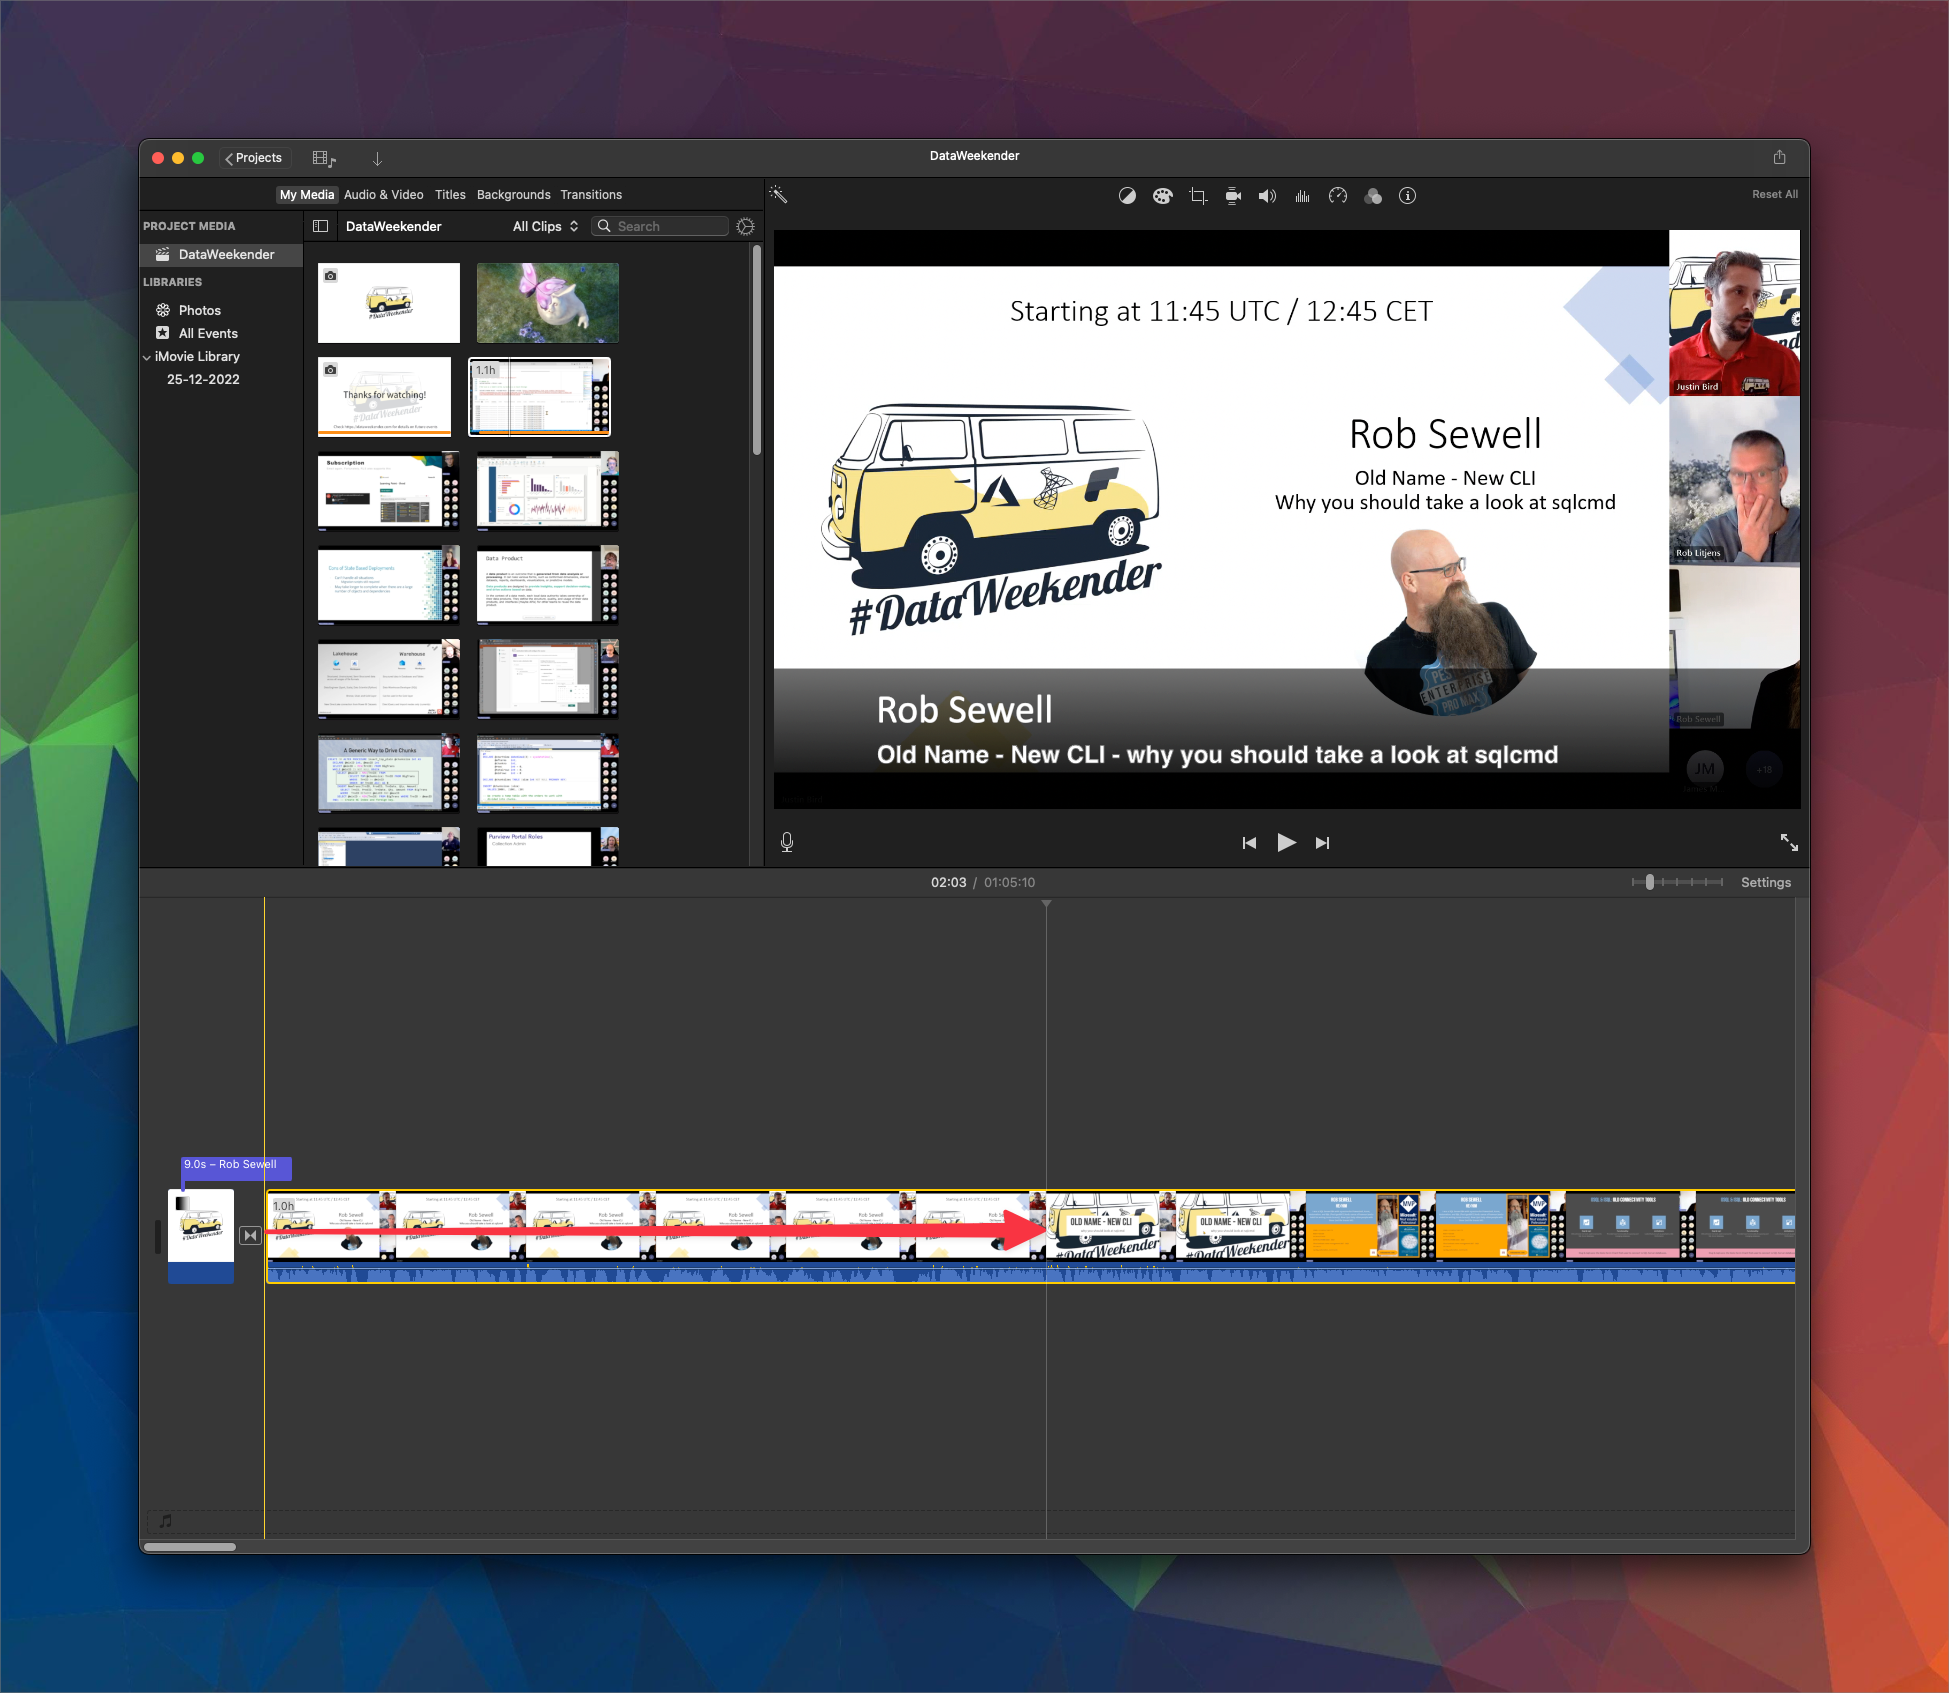
With my template complete, now all I need to do is grab each recording, swap it in for the test video, trim the start and the end and send it off for processing. I can drag the desired recording over the top of the test clip to replace it:
I need to set the title, to do that I will select the title element and update it with the speaker’s name and talk title.
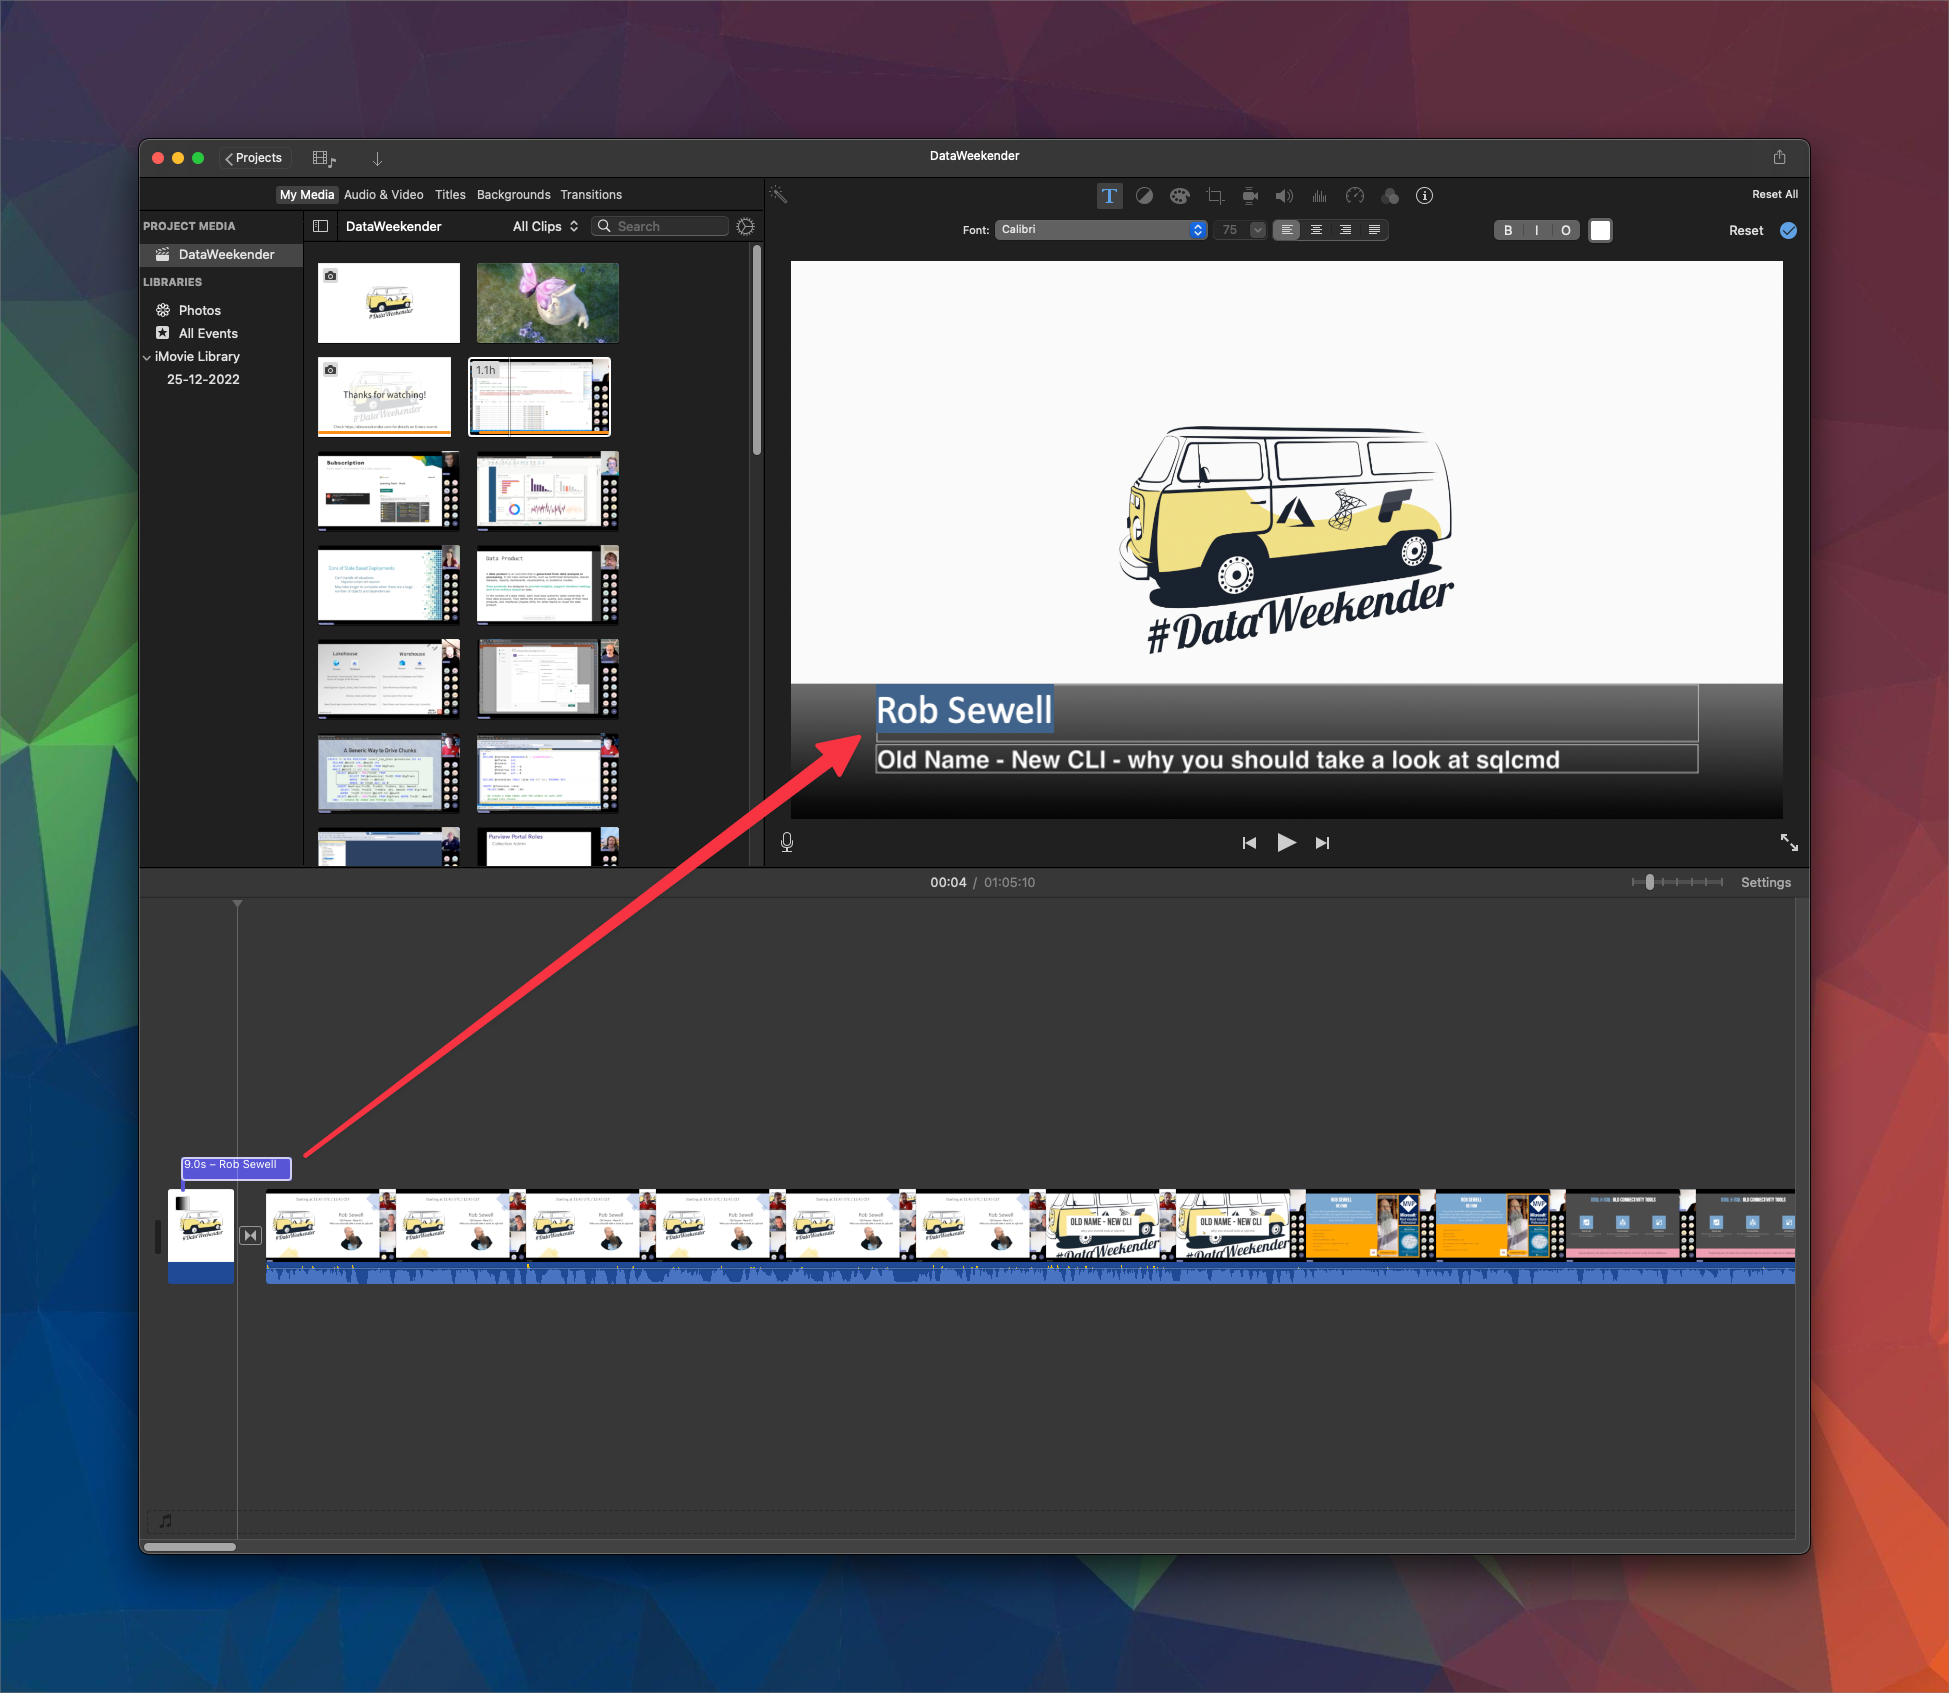
I want to trim the start of this video, to do that I will drag the left edge of the recording to the right to find the precise point at which I want it to start. I can repeat this process to find the exact point that I want the recording to end.
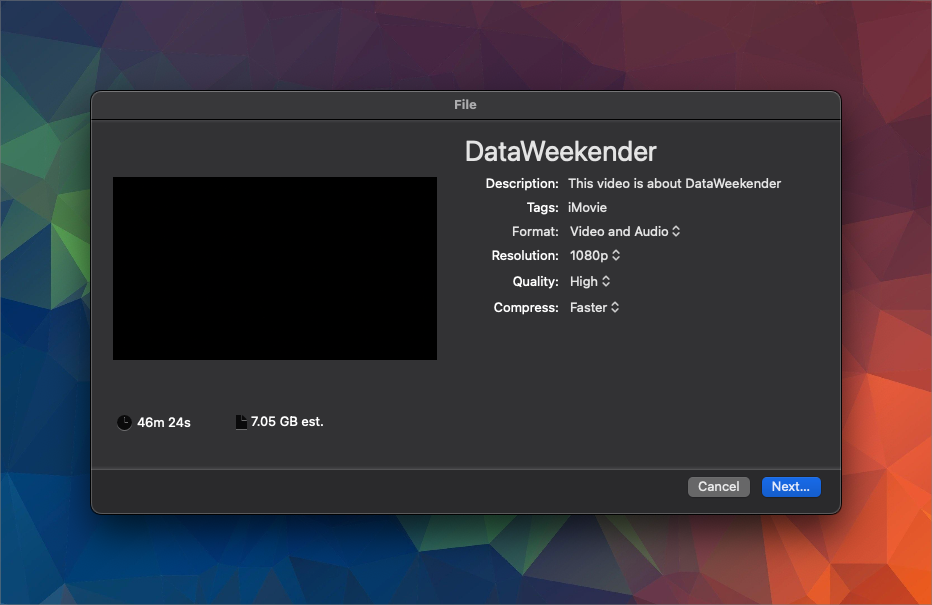
Now I can set it for processing! What isn’t cool is the estimated size is significantly bigger than the original. This is probably down to compression settings or something like that? I don’t know enough about that, I chose to not worry too much about those settings and just go with the defaults. In hindsight though, I think I should have spent a bit of time determining the optimum settings because I didn’t think about how long it would take to upload the files. That’s just one video!
Now I have a process
Once the first recording was done, processed and reviewed to make sure I was happy with it, I had to go through the following steps for each talk:
- update title element
- drag in next talk
- trim start of talk
- time end of talk
- test transitions
- process
One thing I did end up doing is splitting the files roughly using QuickTime because there were a few features that allowed me to keyboard-shortcut my way through splitting the files pretty quickly. Firstly, opening up one long file, I could find a break and create a split using a keyboard shortcut, delete the bit I didn’t want, save the file, undo the delete, then re-split it for the next talk and repeat. That then allowed me to bring all files into iMovie roughly split. I used iMovie to finely trim the files to the desired points. Creating the next recording was simply a case of dragging the next file into the timeline and iMovie offered me the ability to replace the existing clip. This was pretty time consuming in the end. I also had to wait for iMovie to complete all the processing and do final review of all the transitions to make sure they looked ok.
With all that done I need to send the files to YouTube!
Youtube
I did wonder what considerations I should make for Youtube. I am not out for YouTube domination here, but I figured it would be useful to assess what things I should consider. A quick google lead me to this page where I pulled a few easy to implement tips:
decide keywords for every file
put those keywords in:
- video file name (before uploading)
- video title
- video description
- tags
add playlists - I will set up playlists for the year, the year and track number, then consider how to curate the talks into different data categories.
add a thumbnail - I am going to keep this super simple, all talks will get the #DataWeekender logo for now.
YouTube also has a call to action feature, I don’t think I am going to use this this time around, but it’s something to consider for the future. That would potentially allow me to avoid having to set up an outro.
I also wanted to find out if there was a way to create a subscribe link for the channel, that is pretty straightforward. If you grab the URL for your channel i.e. https://www.youtube.com/@dataweekender you simply add ?sub_confirmation=1 to the end of it and that will create a subscribe link. I converted that into a bitly link which I will use in the description of each talk.
Calling on ChatGPT
I have a trial with ChatGPT at present and I am going to use it to generate the video descriptions. I wanted to produce a super concise call to action that I could template and use for each talk, above which would go the speaker name and abstract. I am cutting corners here but writing gimmicky things is not in my nature, so this will give me an initial draft that I can refine to my liking.
I am really enjoying using ChatGPT, if I am really explicit with my prompts, I find it really effective. Here is my prompt and its output:
“I want you to write an engaging description for a youtube video. Maximum characters is 5000. I want you to include the following information
- An Online Microsoft Data Conference
- We plant trees for every talk submitted to offset Co2 https://bit.ly/DataWeekenderForest
- Subscribe to our YouTube Channel https://bit.ly/DataWeekenderYouTubeSubscribe
- Visit our website https://bit.ly/DataWeekenderSite
- Join our UserGroup to hear first about future events https://bit.ly/DataWeekenderMeetUp
Leave room for me to put information about the talk, the speak and the talk description. These three things should be at the beginning followed by a call to action.”
🌟 Welcome to #DataWeekender Online Microsoft Data Conference!

Title:
Speaker:
description: "
👉 Don't forget to SUBSCRIBE to our YouTube Channel for more insightful talks and updates: https://bit.ly/DataWeekenderYouTubeSubscribe 🔔

🔗 Explore more about us and our events on our website: https://bit.ly/DataWeekenderSite 🌍

📢 Be the first to know about our future events! Join our UserGroup: https://bit.ly/DataWeekenderMeetUp 🤝

🌱 We are committed to a greener planet! For every talk submitted, we plant trees to offset CO2 emissions. Contribute to our forest here: https://bit.ly/DataWeekenderForest 🌳

👇 Share your thoughts in the comments below and engage in the conversation!

📌 Remember:

Like 👍 if you find this talk informative.
Comment 💬 with your insights or questions.
Share ➡️ this video with your network to spread knowledge.
🔔 Stay tuned for more content, and let's drive the future of data together!

#AzureDataConference #DataWeekender #Data #MicrosoftDataPlatform
I made a few adjustments to structure it how I wanted, but utilising ChatGPT cut down my time to produce this massively and it’s actually really good. I am not one for corny lines though…I don’t like that last line so that is going!
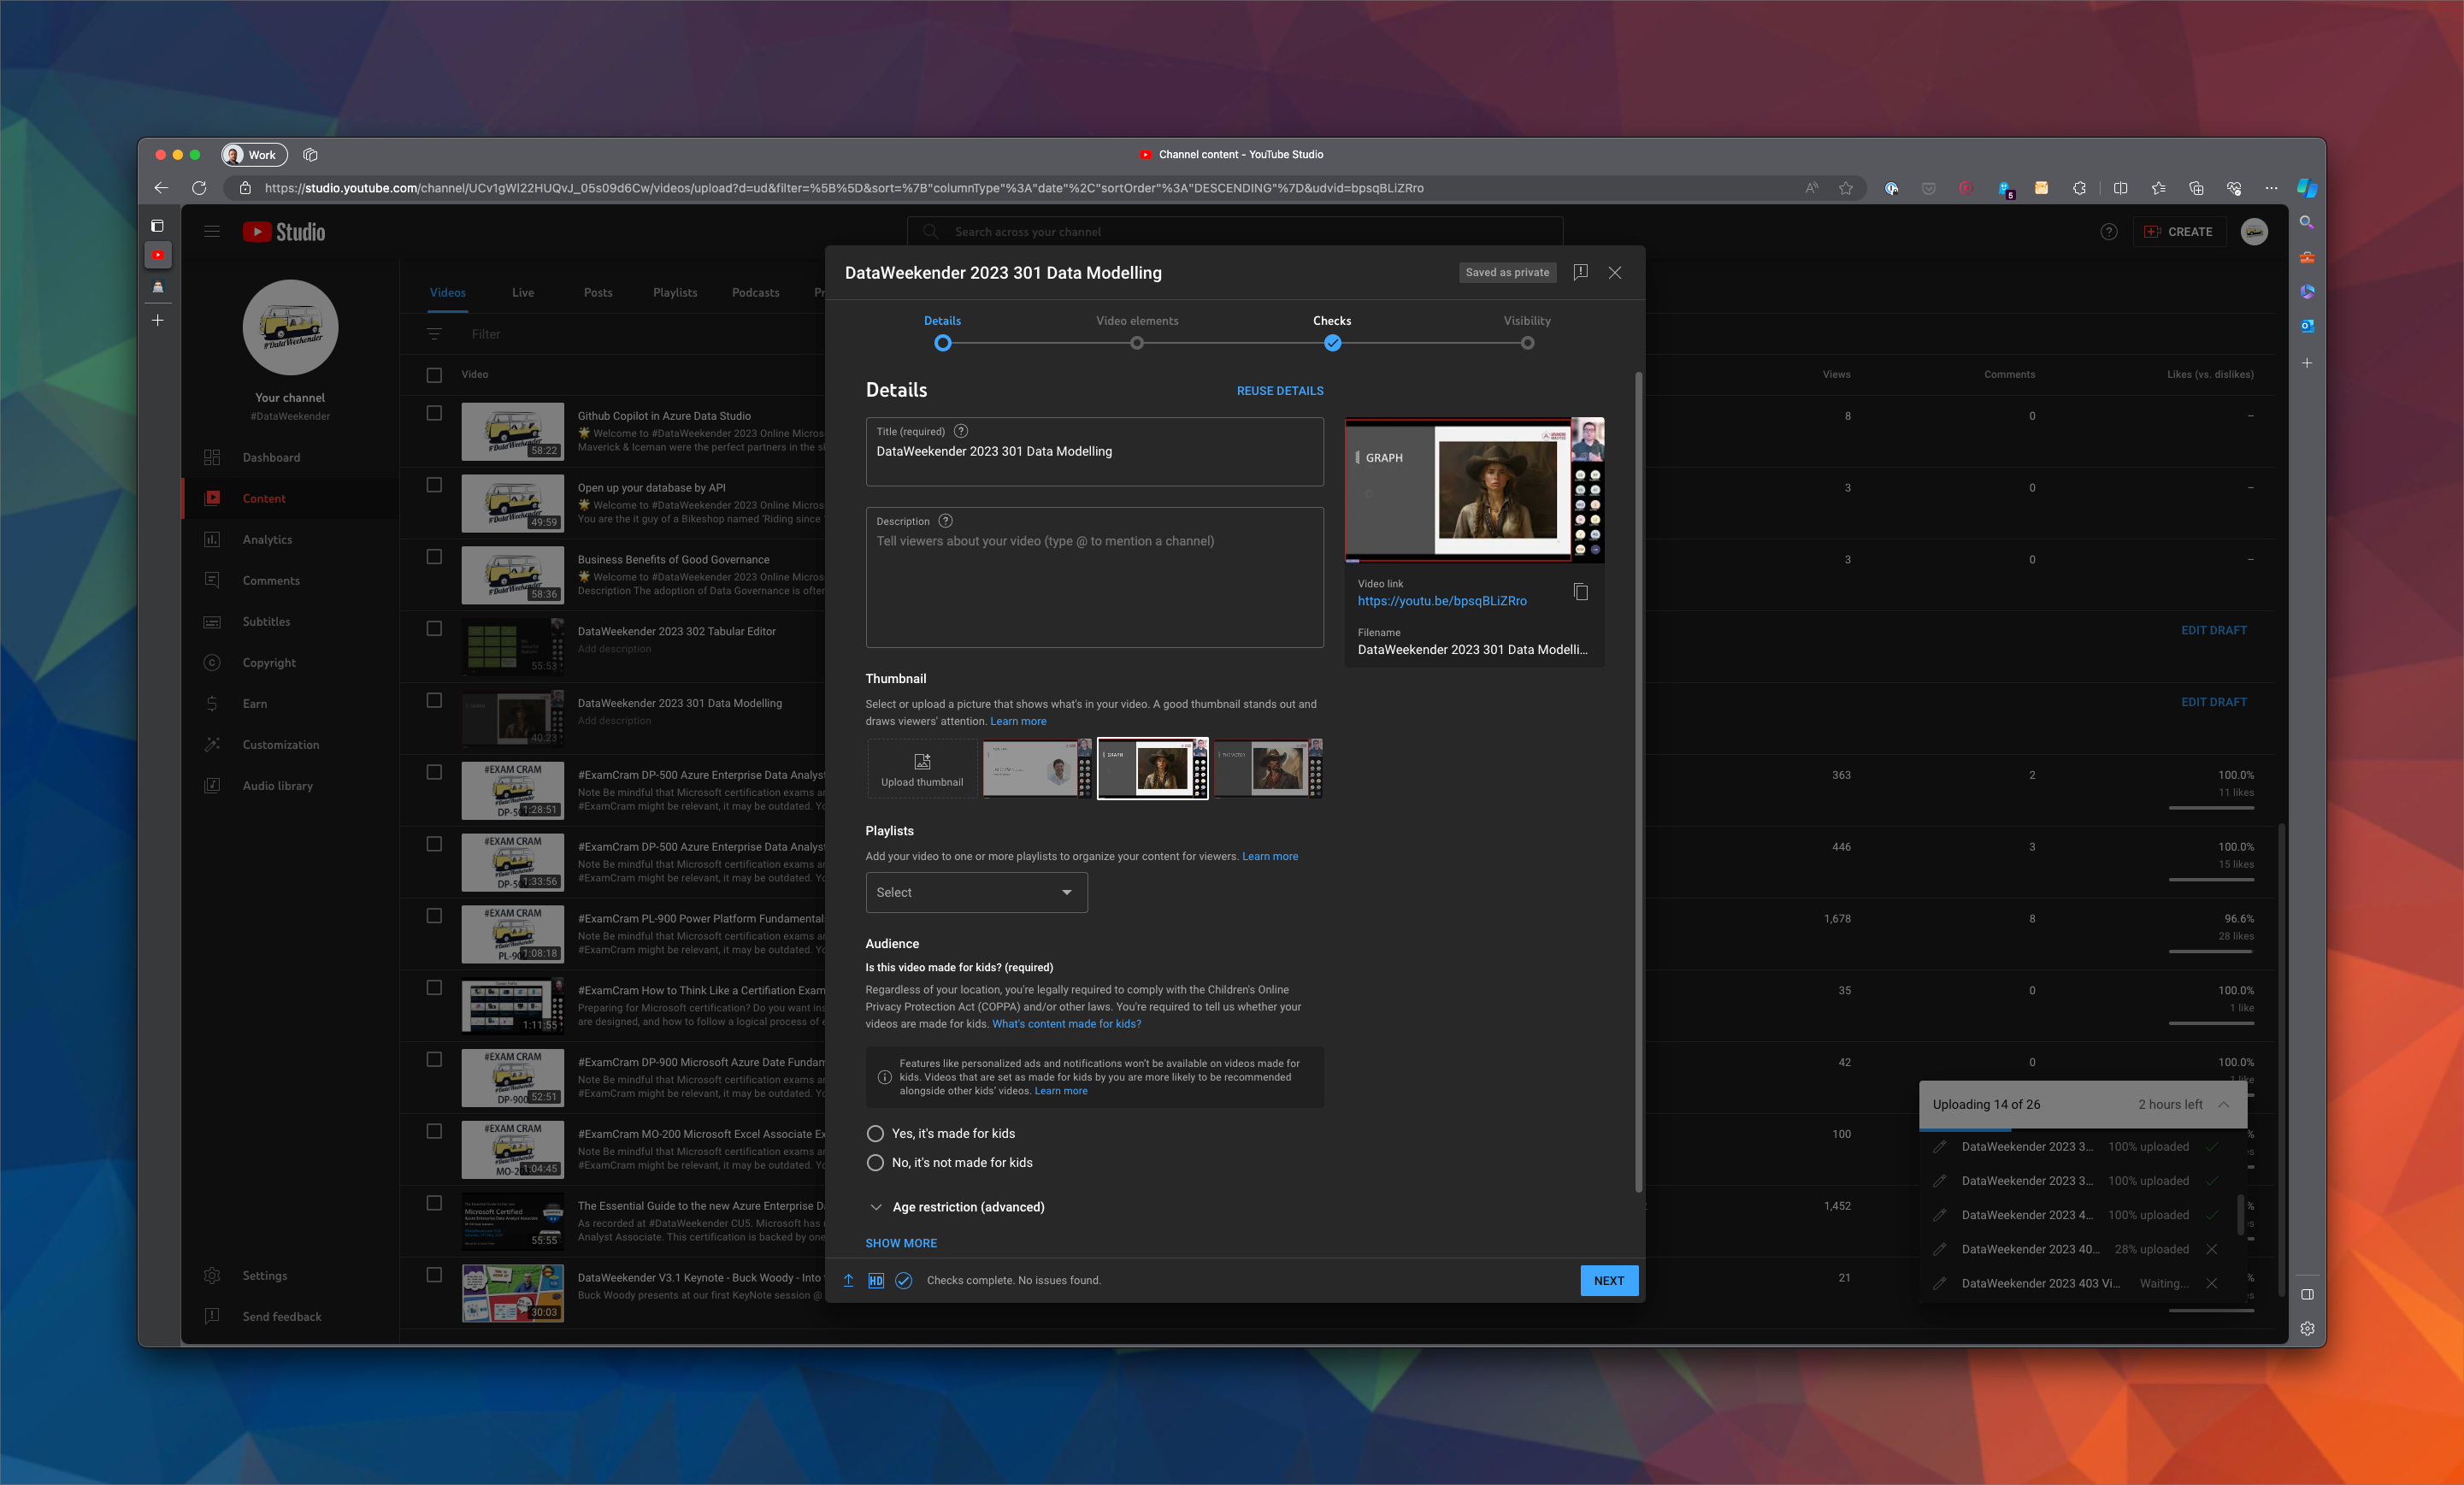
YouTube Studio
YouTube Studio is the place to manage all the videos. Here is a screenshot of my content area: "
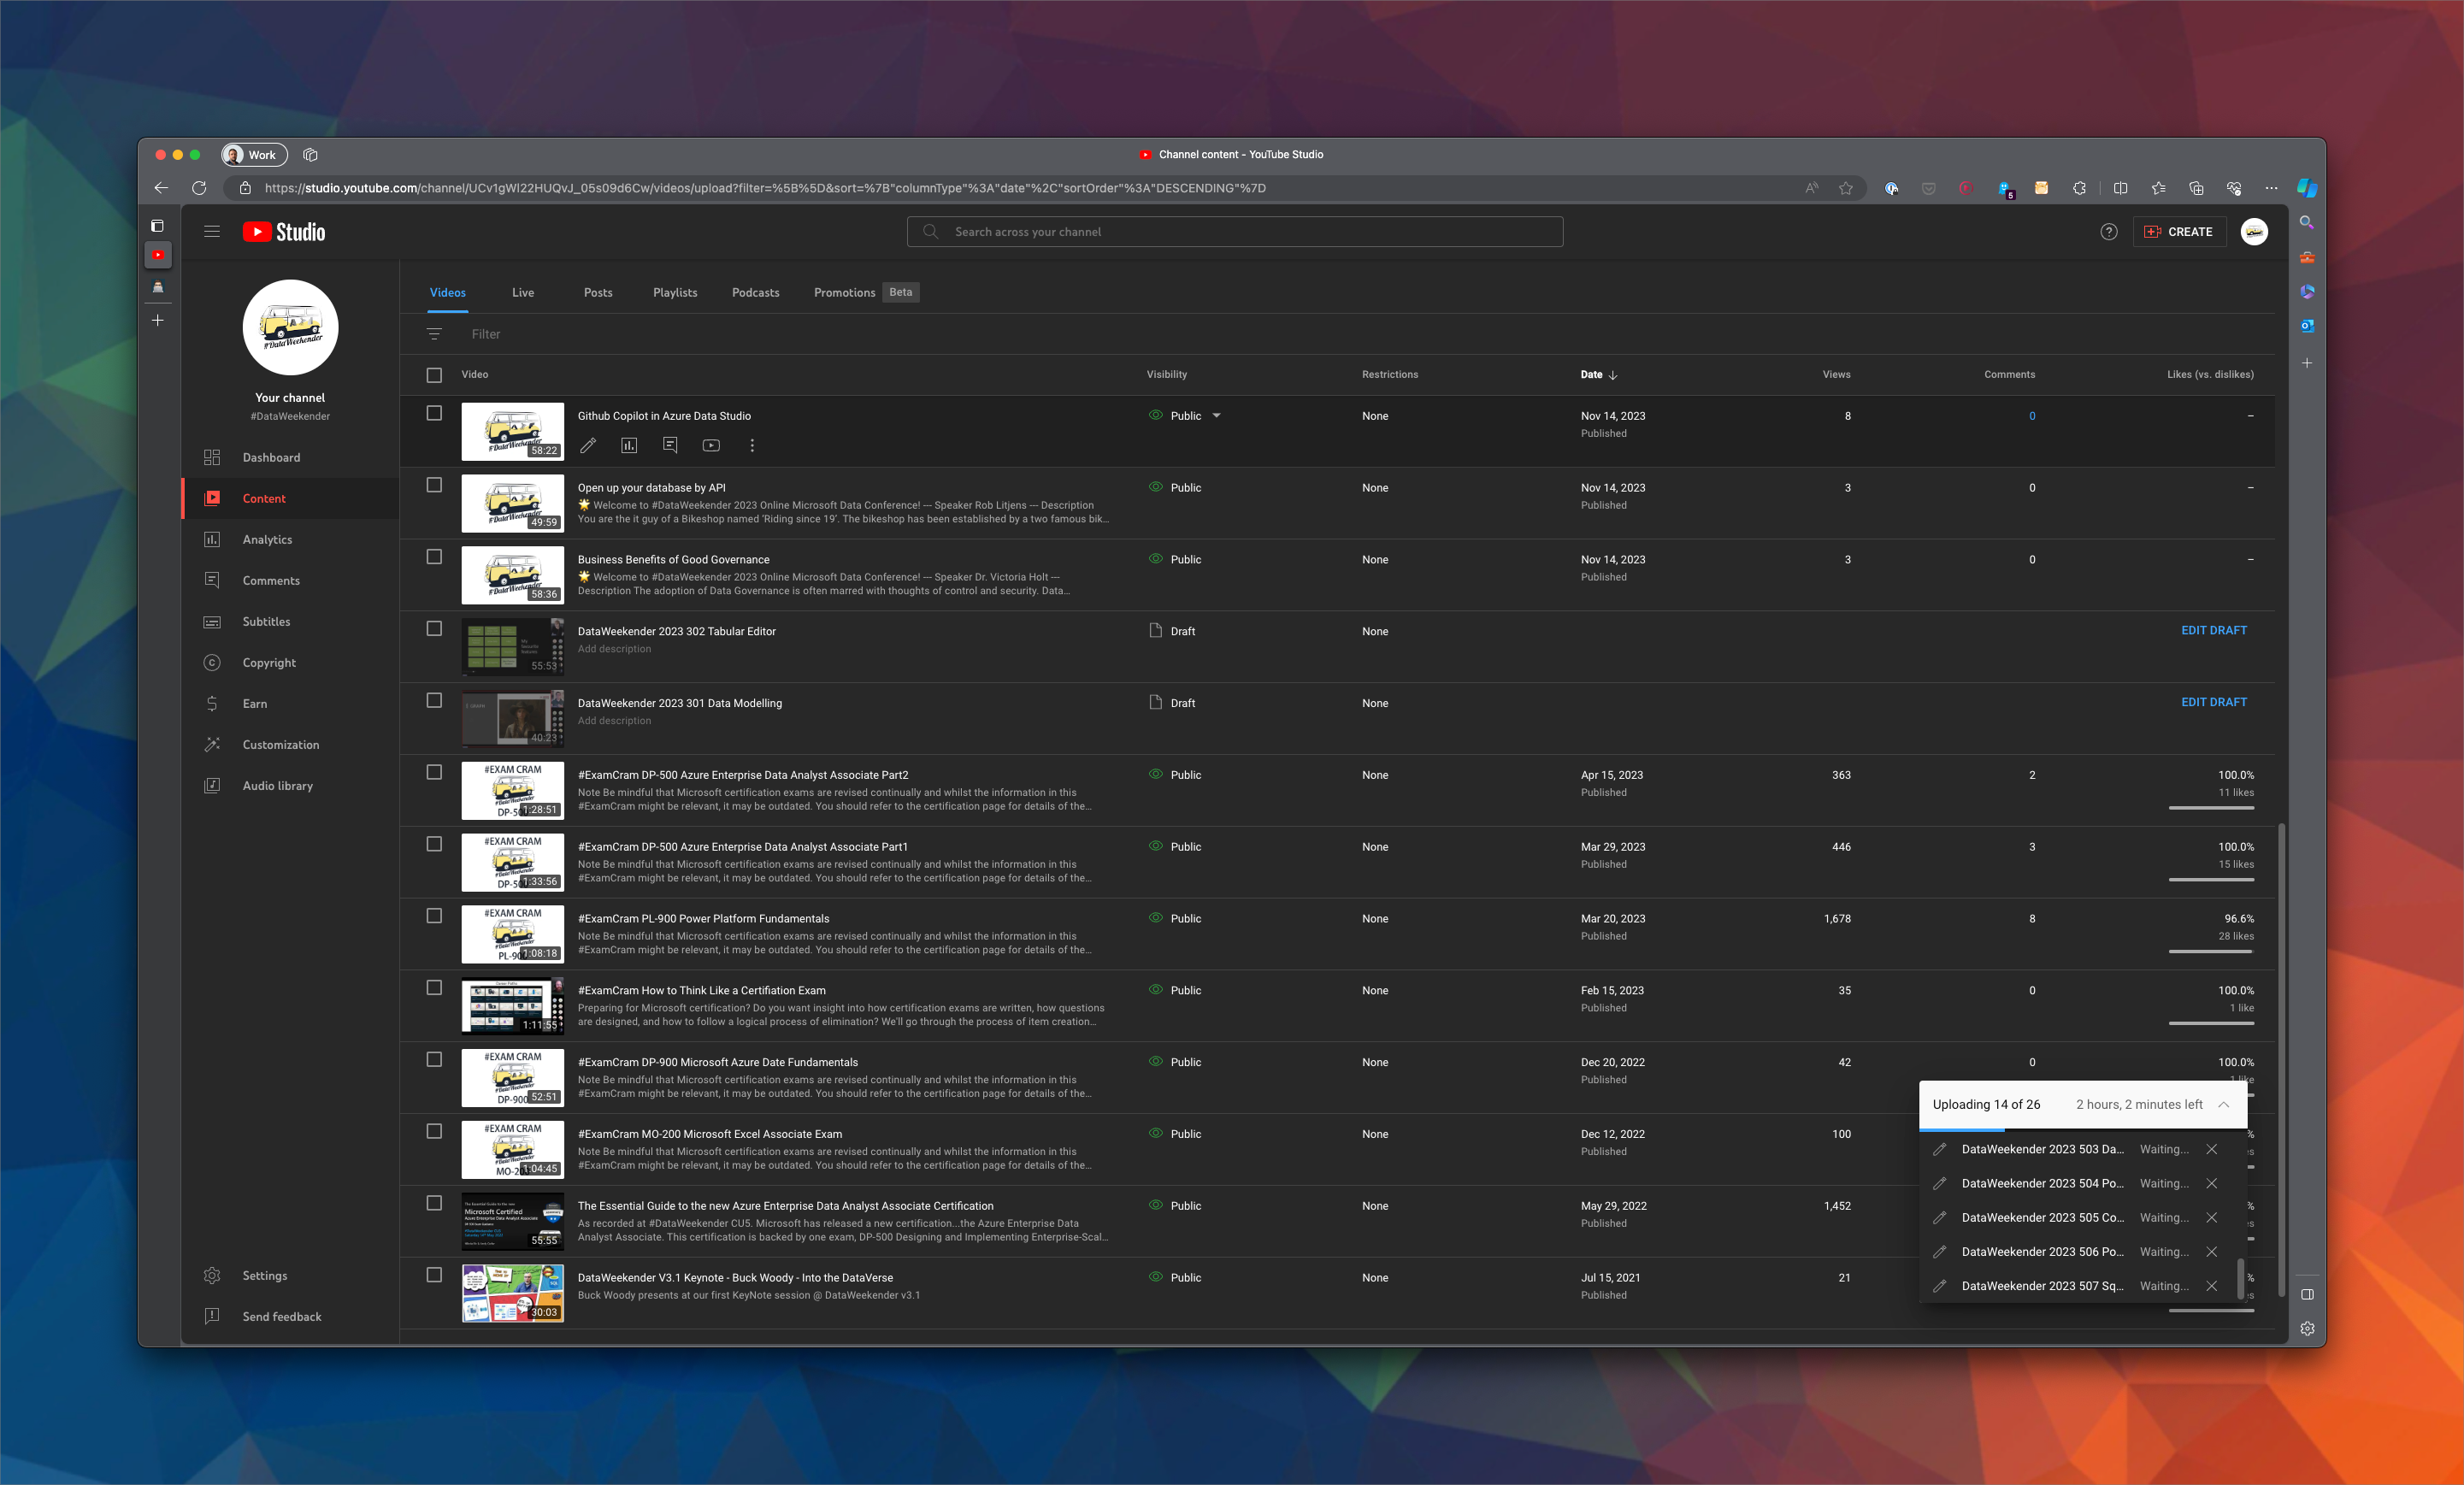
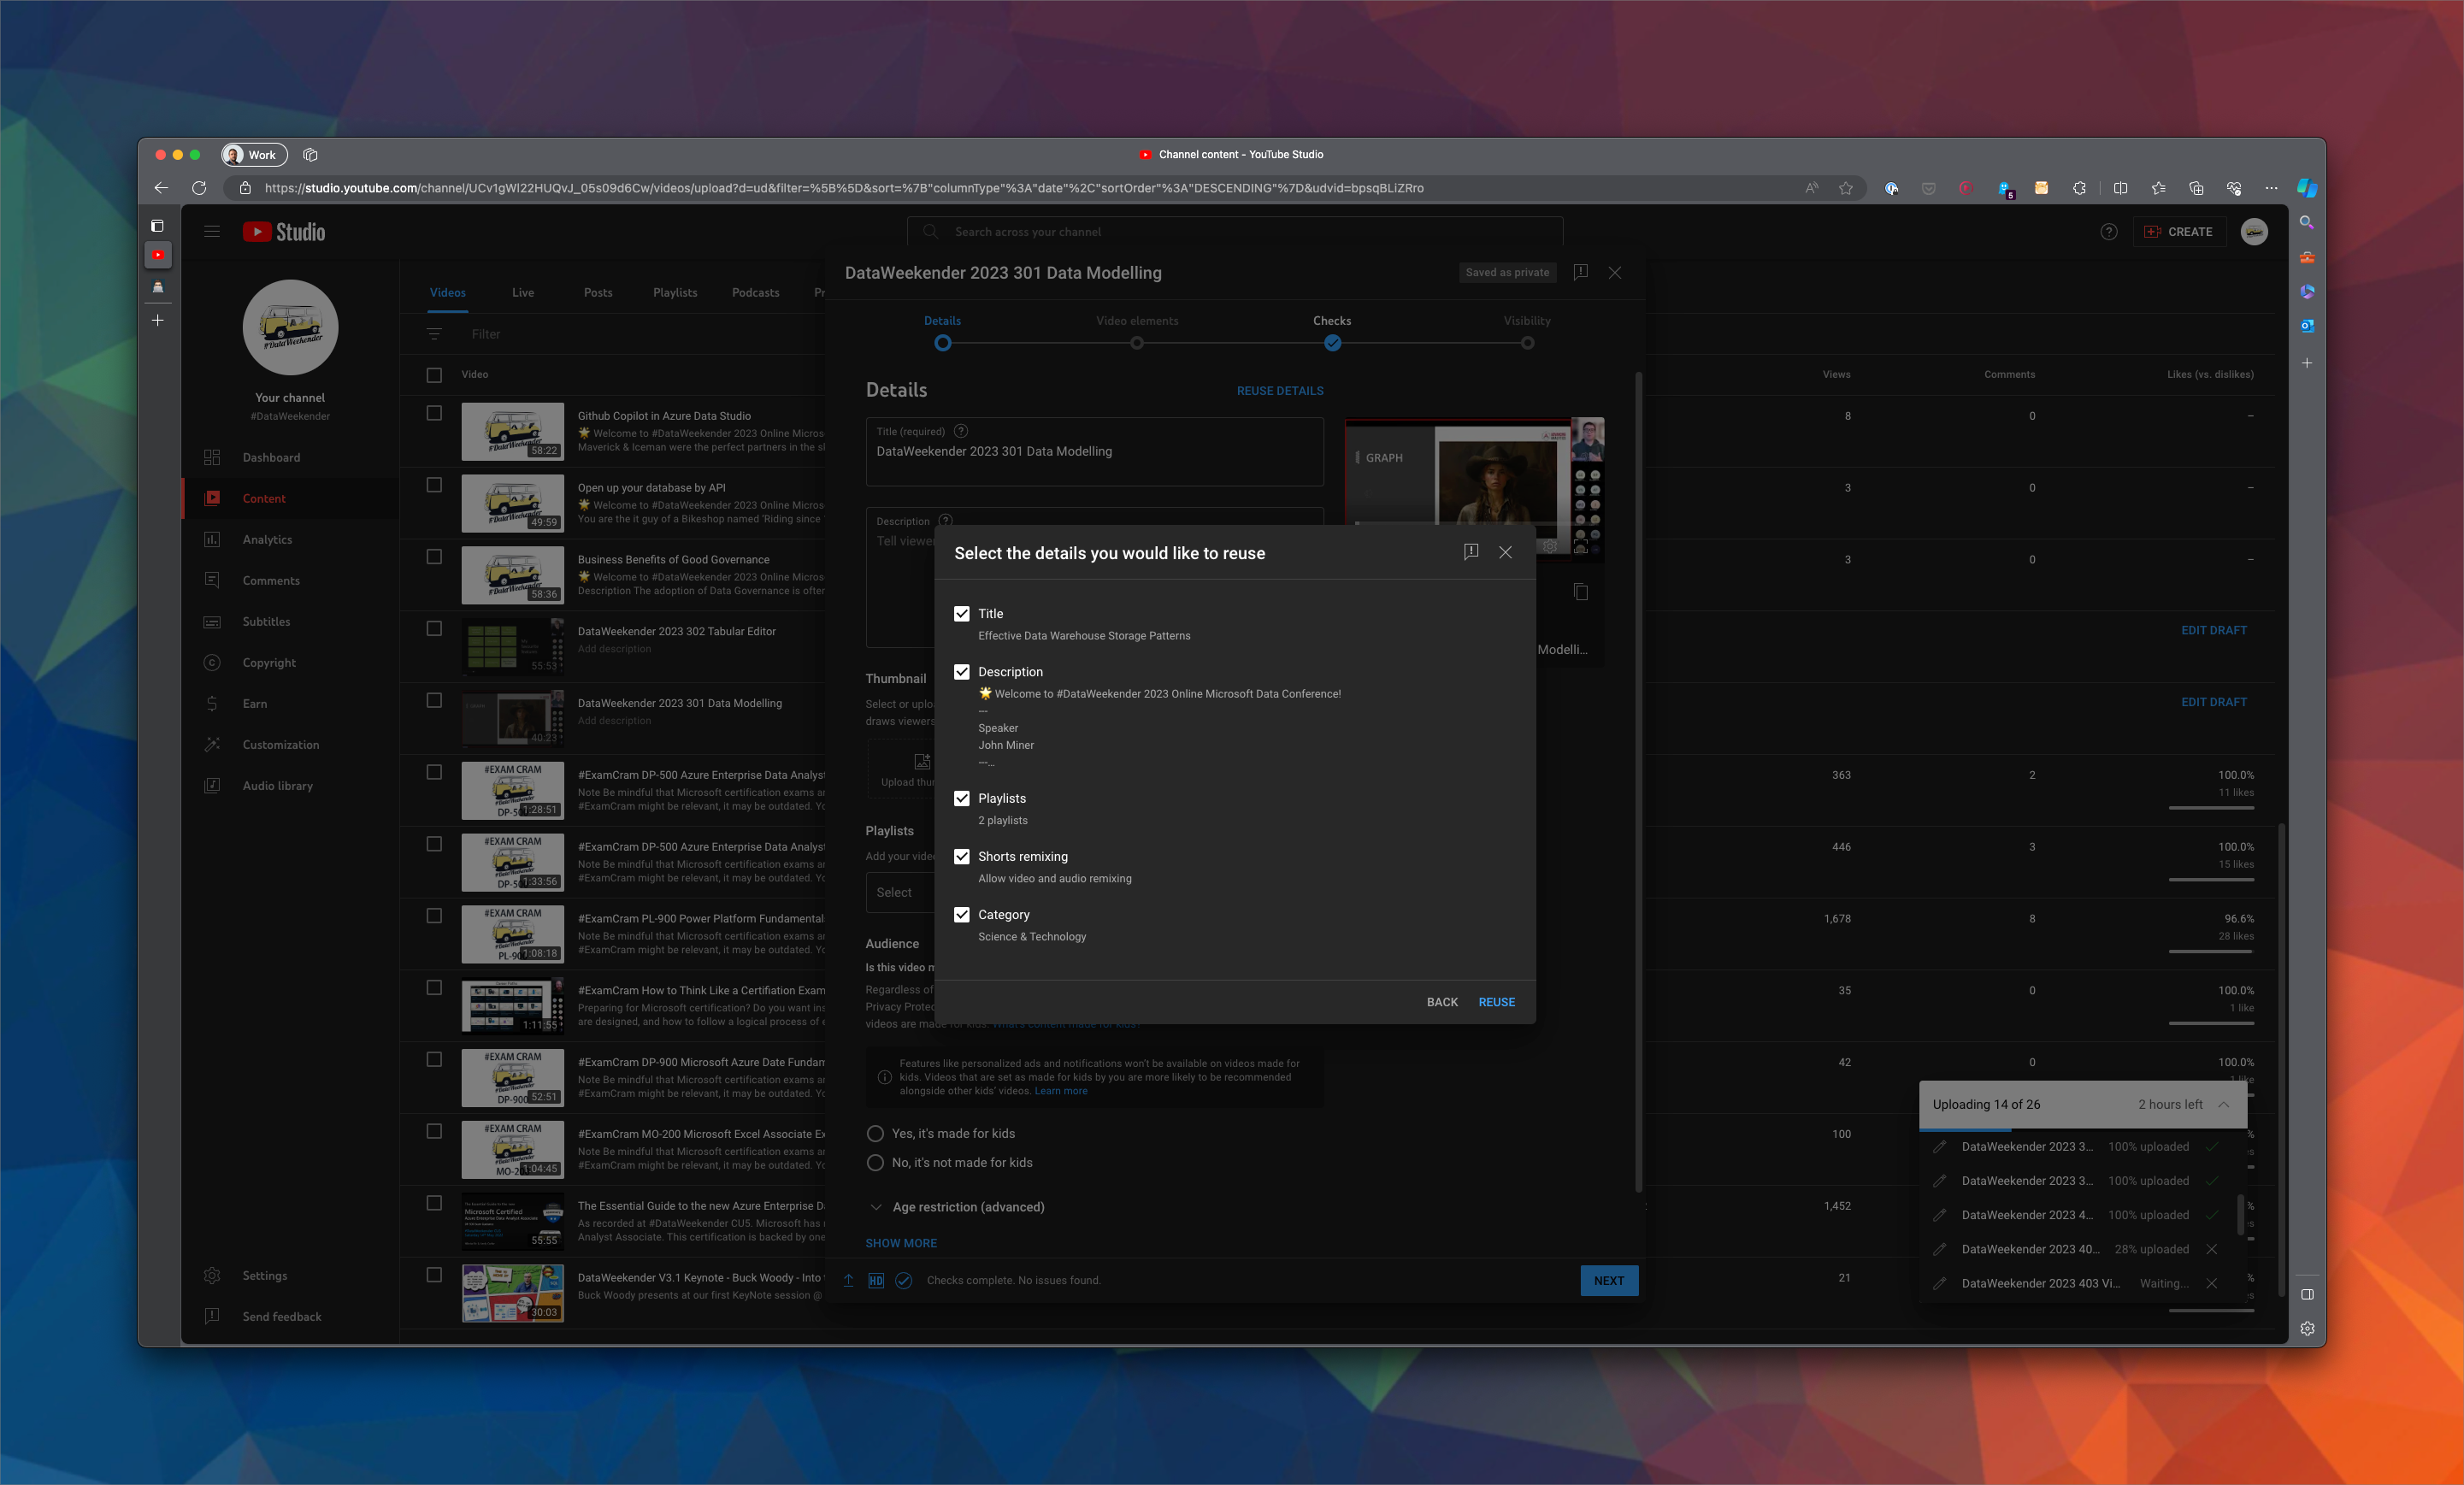
You upload files by clicking the create button on the top. Once the files are uploaded they are processed by YouTube. Whilst files are being uploaded I can edit them to apply my own settings. This gives me the options to alter the talk title, add a description and set other things such as tags, playlists etc. I can also choose to publish the talks or schedule them. Note that there is a REUSE DETAILS option towards the top:
Clicking the REUSE DETAILS option allows me to select a video I have already edited and reuse content from there, so to speed this up I can select the description from the previous talk along with the playlists and other settings. Whilst I need to alter the speaker, title and abstract, much of the remaining stuff is consistent so that will save some time.
Finally I can publish the content (once it’s all uploaded that is)!
Issues
I have hit a few unexpected issues…
Teams overlap didn’t overlap
The recordings don’t overlap and teams adds a header to the recording which means splicing them back together isn’t perfect. I did try to get the files to sync up but it just doesn’t provide enough overlap to make it work. Perhaps iMovie is also at fault and doesn’t offer me enough fine tuning ability. At the moment, talk 3 of track 3, Nandan in track 5 lightning talk and talk 5 in track 2 have a noticeable jump. I may try and revisit them to see if I can improve things at all.
This may force us to change our approach to recording in the future. To address this, we could stop recordings and re-start them at specific times of the day to ensure that we don’t get any inadvertent splits. I don’t really want to rely on manual recording, but perhaps is the only way.
Limit on number you can upload
Using YouTube studio was a bit annoying because you can only upload 15 videos at time, that meant I couldn’t set and forget.
Don’t go to sleep
My computer went to sleep during the first evening resulting in me losing one night’s worth of uploading dammit! And ridiculously I shut my computer down last night so I lost another night’s worth of uploading! I have no idea what I was thinking, but I just went into autopilot.
No queue in iMovie
There is no queue! As I am processing files, I am ahead of the processing - I am editing video 12 whilst it’s still processing video 7 and video 8, 9, 10, 11 are waiting to be processed. But there is no way to alter the queue or even see it, all I can see is the current processing file! That disrupted me at one point because I fired off a file to be processed only to realise I hadn’t changed the title and I couldn’t stop it being processed! How maddening.
Excessive file sizes
The files exported from teams were between 300MB and 650MB but exported back out of iMovie were 1GB+! No matter what options I tried, I couldn’t get it to export back out a comparable file size. The audio was exported as stereo whereas it was mono to start with and even when I appeared to get a similar compression format for the file it was still 1GB+. Some of the file exports were incredibly huge. I saw recommendations online to export as the best possible but that resulted in 50GB+ files! I would have been uploading until Christmas! In the end I think I went for High quality and optimal compression that resulted in a file size of close to 1GB, still twice the size that I started with!
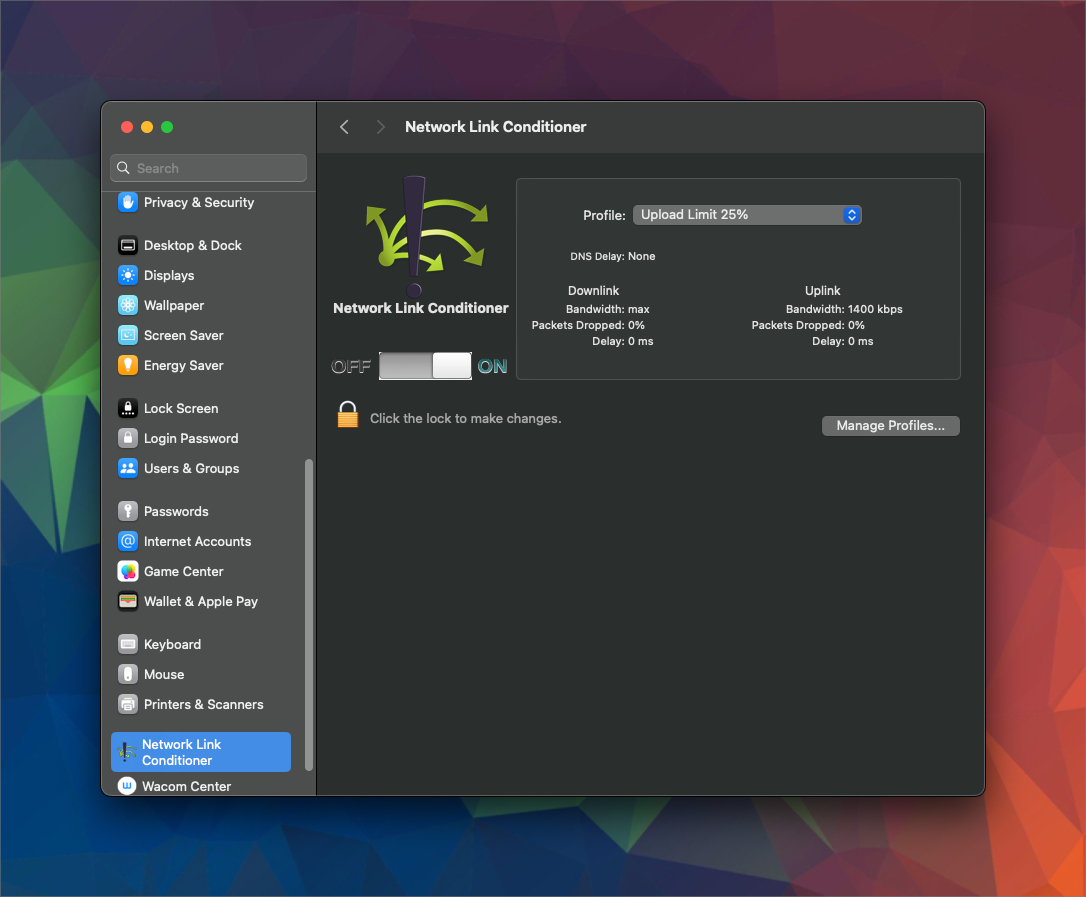
Network is swamped
I am uploading a total of 52GB to YouTube! My network is swamped. I had to take action because it was interfering with my network connectivity and turns out it is REALLY hard to throttle traffic on a Mac! After some research I landed on a tool through the Apple Developer program called Network Link Conditioner which allowed me to set upload limits. It works pretty effectively.
What would I do differently next time?
I think we are definitely going to have to take a different approach to recording next time, simply to ensure the speaker’s talks are not interrupted. I think I will also explore different options for video editing for next time, I also want to understand how I can avoid increasing file size so significantly. The total size of all files was 18.6GB, that includes all the breaks! All I added to the recordings were two static images so for the uploaded content to come in at 52GB is totally unnecessary. That has affected both processing time and upload time. I also want to find ways to streamline the process to YouTube, I am hoping that some editing tools will offer direct publish to YouTube, meaning I can deal with it all in one place. There is probably going to be some opportunities to automate some of the steps too.
If anyone has any advice or tips, please let me know in the comments.
Go check out the result
I am pleased with the outcome, it took a fair bit of effort, but was a successful exercise I feel. You can see the result of my work here . Each track is being released sequentially at 13:00 UTC between 2023-11-14 and 2023-11-18.
Appendix
[1] I did some research around uploading to YouTube and some of the guidance made this decision for me. There is a concept of time queues which you can put in the chat. I am going to use this for the lightning talks, so instead of splitting them ALL up into separate talks increasing my workload, I will keep them together and place links in the description to the start of each talk.
[2] Mikey Bronowski is a joy and makes me laugh, I really wanted to retain a tonne of his interactions because they are hilarious. I may have to have discussions with Mikey about a Mikey-reel.
[3] I also want to bring your attention to Laura GB’s wrap up, trying to decide where to stop that talk, the wrap up was so funny I had to leave it in!
[4] After reviewing a few of the talks, it was clear that it was just better all round to find a suitable point at which the mic was handed over to the speakers and start the talk from there. It was the same with the wrap ups, this was a tough call but it just made sense to cut things off prior to questions. I took some influence from Data Toboggan, but also based on how the questions panned out across a few of the talks.

#mtfbwy